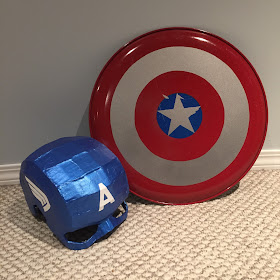
Whether you're looking for a great costume accessory or a unique decor item for a room, Captain America's shield is an eye-catching and easily-recognizable item. There are a variety of styles of the shield available to purchase, from small, plastic toy ones to expensive, screen-accurate metal replicas, but it's not that difficult or costly to make your own.
The base for the shield is an inexpensive and readily available item: a metal pizza pan. I purchased mine at a dollar store for a few bucks. The size of the pan determines the size of the shield, so you can make it whatever size you need for your intended use.
For the back of the shield, decide what you intend to use the shield for to determine what to attach. If you want the shield for a costume prop, use strong glue to attach handles made of belts, fabric strips, ribbon, or even cardboard. If you want to hang the shield on the wall, you can attach a loop of string or wire for hanging it and pieces of foam to keep it parallel to the wall.
MATERIALS
- metal pizza pan
- blue and red spray paint (for metal)
- contact paper
- painters' tape
- scissors, exacto knife
- pencil, ruler
- circular objects to trace around (optional)
- 5-point star stencil or cookie cutter or similar, or protractor for drawing the star
- strong glue and belt/string/similar for holding/hanging (optional)
1. Remove any stickers/residue from the pizza pan. Thoroughly wash and dry the pan.
2. Trace around the pan on the back of a piece of contact paper. Draw three circles inside, smaller each time. Inside the smallest (center) circle, draw a 5-point star.
Cut out the inner circles and the star.
3. Center and stick the second largest onto the pan.
4. Stick the third largest circle to the pan.
5. Stick the star in the center of the shield.
6. Stick the largest circle to the pan and wrap the edges of the contact paper around the edges of the shield.
If there are any gaps in your contact paper, use painters' tape to cover them.
7. Spray the circle around the star with blue spray paint, following the directions on the paint for drying time. Use thin layers of paint. For some reason, my paint didn't adhere to certain areas of the pan, but I like the "weathered" look.
8. Once the blue paint is thoroughly dry, use an exacto knife to lightly cut the paint around the outside of the circle, ensuring that the paint isn't stuck to the contact paper.
Peel away the contact paper circle closest the star and the contact paper around the edge.
NOTE: Follow the directions on the paint and painters' tape for drying time between this step and the next.
9. Lay strips of painters' tape on a cutting mat, slightly overlapping them. Trace a circle the same size as your blue circle onto the tape and cut it out.
10. Stick the painters' tape circle over your blue circle and star.
11. Spray paint the second and outer circles with red spray paint, following the directions on the can for drying times. Use thin layers of paint.
12. Carefully peel away the contact paper circle and painters' tape circle.
13. Carefully and lightly, use an exacto knife to trace around the star so the paint doesn't stick to the contact paper. Peel off the contact paper star.
14. Add some "weathering" and "battle damage" marks by scratching the paint off in a few places, if you want to.
15. Attach your belts or string to the back of the shield, as desired. DONE!


No comments:
Post a Comment