Saturday, April 8, 2017
Lego NEXO KNIGHTS Shield
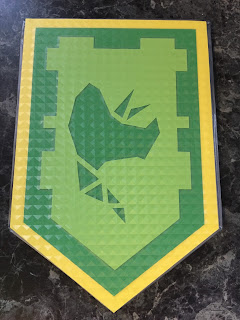
Ever since my son watched "Lego NEXO KNIGHTS", he has been running around the house slaying monsters, rescuing people, and performing other knightly duties. To help him in his quests, I designed and built him his very own shield.
You are welcome to use the following ideas and techniques to build your own style of shield.
There are tonnes of NEXO KNIGHTS shield crest pictures online that you can print off or copy if you don't want to design your own crest. There are also coloring pages on the official Lego webpage that you can print off and have your kid(s) color and design their own crest.
MATERIALS
- cardboard: flat pieces, scraps, tubes (approximately 1" and 1/2", if you can find)
- colored paper: yellow, your main color, accent color
- scissors, exacto knife
- white glue
- spray glue or paper glue stick
- glue gun and sticks
- grey/silver duct tape
- clear contact paper (mactac)
- pencil, ruler
1. Cut 4 cardboard rectangles that are 12" x 8". Mark the center of one 8" side. Measure and mark 3" from that end along both 12" sides. Draw lines from the 3" marks to the center mark, forming two triangles. Cut away the triangles to get the shield shape. Repeat for all four rectangles.
2. Glue the four shield shapes together on top of one another with white glue. Put something heavy on them to keep them flat while they dry.
3. Cut a yellow rectangle that is 12" x 8". Mark the center of one 8" side. Measure and mark 3" from that end along both 12" sides. Draw lines from the 3" marks to the center mark, forming two triangles. Cut away the triangles to get the shield shape.
Cut a rectangle from your accent color that is 11" x 7". Mark the center of one 7" side. Measure and mark 2 5/8" from that end along both 11" sides. Draw lines from the side marks to the center mark, forming two triangles. Cut away the triangles to get the shield shape.
Cut a rectangle from your main color that is 10" x 6". Mark the center of one 6" side. Measure and mark 2 1/4" from that end along both 10" sides. Draw lines from the side marks to the center mark, forming two triangles. Cut away the triangles to get the shield shape.
4. On the back of the main color, mark lines 1/2" from the outside edge on the top and long sides. Mark lines 1/4" from the outside edge on the two angled sides at the bottom.
Around the long sides and top, mark squares and rectangles in 1/2" increments within the 1/2" border you marked. The pattern can be symmetrical or random. Look at pictures online for inspiration. Once you're happy, cut out some of the squares and rectangles from the edge. Cut away the 1/4" area you marked along the two angled sides.
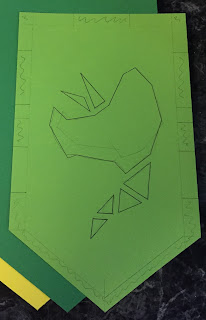
Add your design in the center. I drew mine on the back and cut out the pieces, allowing the accent color to show through. You can draw on the front, apply stickers, or glue on printed pictures.
5. Use paper glue or spray glue to attach the main color shield onto the accent color shield and the accent color shield onto the yellow shield.
Cover the front of the layered paper shield with clear contact paper. I had some with squares embossed on it that gives the shield a digital look.
6. Wrap the edge of the cardboard shield with duct tape.
Glue the layered paper shield to one side.
7. Cover the opposite side of the shield with duct tape.
8. From scrap cardboard, cut 18 rectangles that are 1" x 1.5". Fold the rectangles in half width-wise (to look like little books).
From the 1" diameter cardboard tube, cut two pieces 1/2" long.
From the 1/2" diameter cardboard tube, cut two pieces 1" long.
9. Cover the outsides and edges of 14 of the little rectangles with duct tape.
10. Cut two corners off of each of the remaining four little rectangles. They should look like little shields with a vertical fold down the middle.
Use duct tape to attach one little shield piece to one little rectangle piece (so that they look like a little hockey stick shape), covering the outside and edges with tape. Repeat for a second little shield and rectangle pair.
Use duct tape to cover and attach together the remaining two little shield shapes into a V-shape, covering the outside and edges with tape.
11. Center one of the 1/2" diameter cardboard tube pieces inside one of the 1" diameter cardboard tube pieces. Fill between them with scrap cardboard. Fill inside the 1/2" diameter cardboard tube piece with scrap cardboard. Repeat with the other two tube pieces.
Cover both tube pairs with duct tape.
12. Using a glue gun, attach the pieces from steps 8-11 around the edges of the shield as follows:
BOTTOM POINT: V-shape
ANGLED CORNERS: hockey stick shape
LONG EDGES: rectangle flush with the top of the edge, three rectangles between that one and the angled corner
ANGLED EDGES: two rectangles between the angled corner and the bottom point
TOP EDGE: tube pairs at both corners
13. Cut three 1" wide strips of cardboard: 4" long, 6" long, and 8" long. On the 8" piece, fold the ends up 1" from the end and down 2" from the end. On the 6" piece, fold the ends down 1" from the end. Glue the 6" strip on top of the 8" strip and the 4" strip under the 8" strip, so that the middle 4" is three layers of cardboard, the next inch on both sides is two layers of cardboard, and the inch at both ends is a single layer of cardboard. (I used binder clips to hold the strips while the glue dried.)
Cover in duct tape.
14. Glue and tape the handle to the back of the shield.
DONE! Raise the shield to the air in victory.
Stay tuned for a tutorial on making a matching sword.
Subscribe to:
Post Comments (Atom)


No comments:
Post a Comment