Showing posts with label hockey. Show all posts
Monday, September 25, 2017
Hockey Puck Display Shelf
I love hockey and have a lot of hockey memorabilia in my collection. Pucks are some of my favorite souvenirs and when I was rearranging my "fan cave" this summer I decided to come up with a better way to display my pucks.
We had already painted the walls to mimic hockey arena boards: light grey at the top, a blue stripe across the middle (at 1m/39" up from the floor), white below the stripe, and yellow trim around the bottom. I decided that making a narrow shelf to mount on the blue stripe would be a great place to display the pucks.
This project requires some power tool usage, so I enlisted some help. For those familiar with power tools, this isn't a complicated project.
MATERIALS
- wooden 2X4 or 2X2 cut to the length you want your shelf to be
- screws (2 1/2" or 3")
- latex paint or wood stain, paint brush
- wood filler or drywall putty, putty knife
- pencil
- sand paper
TOOLS
- table saw
- drill, drill bits, screwdriver bits
- level
- tape measure
- stud finder
1. Decide where you want to put your shelf (or shelves). I chose to put mine at 1m (39") up from the floor, but you might want yours up closer to the ceiling or above your TV or wherever. Measure the length of your space and decide how long you want your shelf. I wanted mine to go from the corner of the room across to my shelving unit. Cut your piece of wood this length.
2. My shelf has a groove that is 1/4" deep and a hair more than 1" wide. All hockey pucks are 1" thick and I wanted to make sure they didn't easily tip off the shelf if someone bumped it or the wall. My total shelf is 1 1/2" high (the same height as a 2X4) and just over 1 1/4" deep. You can adjust your groove to be deeper if you want more "lip" at the front, but keep in mind that this will hide more of the puck. Cut the groove down the length of the board.
3. Use a stud finder to find and mark your studs on the wall. My uncle showed me a trick for this: apply a strip of painters tape across the wall above and/or below where you want to put your shelf and make your marks on the tape. Once the shelf is mounted, remove the tape.
4. Get someone to help you hold the shelf in position on the wall. Balance the level on it to keep the shelf level. Use a drill bit that is the same size as the narrowest part of your screws (so that the threads would still "bite") and carefully drill through your shelf into the wall at the center of each stud.
5. Move the shelf and drill the holes in the wall deeper into the studs. Sand any rough spots that are sticking out.
6. Use a bigger drill bit and re-drill the holes through the shelf so the screws won't "bite".
7. Use an even bigger bit to drill just the very outside edge of the holes so the screw heads will "sink" in to the wood. Sand away any rough spots that are sticking out.
8. Paint or stain the shelf. Apply additional coats if necessary. Allow to dry completely.
9. Starting in the middle of the shelf, carefully screw the screws through the shelf and into the pre-drilled holes in the wall. Don't tighten any screws completely until you have all the screws in place. Tighten all the screws.
10. Fill the screw holes and paint over them. Apply additional coats if necessary. DONE!
Enjoy your beautiful handiwork as you display your puck collection.
Thursday, April 27, 2017
Hockey Season Scarf or Afghan
While browsing on Pinterest last fall, I came across the idea to crochet or knit a scarf or afghan that shows a record of events. People do a variety of different things, but the basic idea is to add a row each day or so that records that day's event. Here are some examples:
WEATHER
Each day, add a row corresponding to the weather for that day.
- white = snowing
- yellow = sunny
- blue = raining
- light grey = cloudy
- dark grey or black = thunderstorm
TEMPERATURE
Each day, add a row corresponding to the temperature for that day.
- red = very hot
- orange = hot
- yellow = warm
- green = cool
- blue = cold
- purple = frigid
The idea is to keep adding to the scarf or afghan for a year to create a piece that tells the story of that year. These would make great keepsakes or gifts to track the first year of a baby's life or a couple's marriage. They are also just a fun way to motivate yourself to do something creative every day.
Inspired by this concept, I adapted it to fit one of my biggest interests: hockey. By using my favorite team's colors, I made myself a scarf that shows a record of the wins and losses for the season. With an 82 game regular season, I chose to do double crochet for my rows (15 stitches wide) to make sure that the scarf was long enough to be useful. If you're doing a scarf or afghan for a team with a shorter schedule, you may want to do two rows per game to make sure it's long enough by the end of the season.
HOCKEY
Each game, add a row corresponding to the game result.
- win = team's primary color
- loss = white
- overtime or shootout loss = team's secondary color (optional)
You can make these to commemorate your child or grandchild's hockey season, or adapt it for other sports that they play or you enjoy watching. The key is to make yourself a guide of what each color represents. It's also handy to have a reference for the game results in case you aren't able to work on the scarf or afghan for a while so that you don't miss any rows or forget the results.
For the post-season, I added metallic silver craft thread to the rows. Alternately, you could do a row of grey/silver or another color to show the division between the regular season and the post-season.
What other events or stories could be told in yarn? I'd love to hear your thoughts!
Sunday, February 23, 2014
Go Canada Olympic Gold Medal Mini-Cupcakes
Inspired by the Canadian curling and hockey teams gold medals (both men's and women's), as well as all our athletes and medalists, I present gold medal cupcakes!
Start with red velvet cupcakes and top them with white icing. Then add two blue stripes and an upside down butterscotch chip to create the medal. DONE.
(Sorry the photo is sideways.)
Saturday, June 15, 2013
RIP Kristians Pelss
Sad news today as the Edmonton Oilers have confirmed that 20 year old prospect and former Edmonton Oil King Kristians Pelss died tragically this week while home in Latvia.
I would like to send my deepest condolences to Kristians' family, friends, and teammates with the Oklahoma City Barons and Stockton Thunder. My thoughts and prayers are with you.
Wednesday, December 12, 2012
Hockey, Please Come Back
With the NHL lockout continuing, it has been hard to think about blogging, but I have been supporting my local junior teams and listening to Brett Kissel's latest song "Hockey, Please Come Back" on repeat.
You can watch the video here: YouTube "Hockey, Please Come Back"
You can also get this great song on iTunes here: iTunes "Hockey, Please Come Back"
You can watch the video here: YouTube "Hockey, Please Come Back"
You can also get this great song on iTunes here: iTunes "Hockey, Please Come Back"
Monday, October 8, 2012
Hockey First Birthday
For my son's first birthday, I threw him a hockey themed party. Here are some photos and details:
- invitation = ticket
- cake = foam finger
- Oreos = hockey pucks
- sugar cookie hockey sticks and foam fingers
- arena food menu: pizza, hot dogs, burgers, popcorn, nachos, pretzels, chips
- foam finger pencil toppers and mini Zamboni souvenirs
- scoreboard
- custom water bottle labels and stickers on pop cans
- glass trays = ice
- silver bowls = the Cup
- first star selection
- first draft pick
- pendants banner
- replica Stanley Cup filled with silver candies
- hockey card "thank you"s
1. MINI FOAM FINGERS: I printed off a picture of a foam finger and traced it onto cardboard. After cutting it out of cardboard, I used it as my template to trace onto thin craft foam in various colors. I used Sharpies and paint markers to outline the shape and to write big number 1s on them. I rolled strips of foam into tubes and glued them to the backs, turning them into pencil toppers.
2. SCOREBOARD: I downloaded a picture of a scoreboard that I liked and edited on my computer to add my son's name, make the score 1-0, and make it the first period. I printed four copies of this. I covered an almost cube-shaped box with black wrapping paper, leaving the top open so I will be able to use it as a keepsake box later, then glued a scoreboard to each side. I added a picture from The Hockey News magazine to the bottom, some NHL team logo stickers around the sides, and string to the top so I could hang it from the ceiling.
3. SUGAR COOKIES:
a. HOCKEY STICKS: After rolling out the dough, I cut out simple hockey stick shapes with a knife, then decorated them with icing.
b. FOAM FINGERS: Using the same template as the craft foam fingers, I created my own cookie cutter from an aluminum baking pan, then used it to cut the shapes out of the dough. Each cookie was decorated with colored icing first, then had a number 1 added in white or chocolate icing.
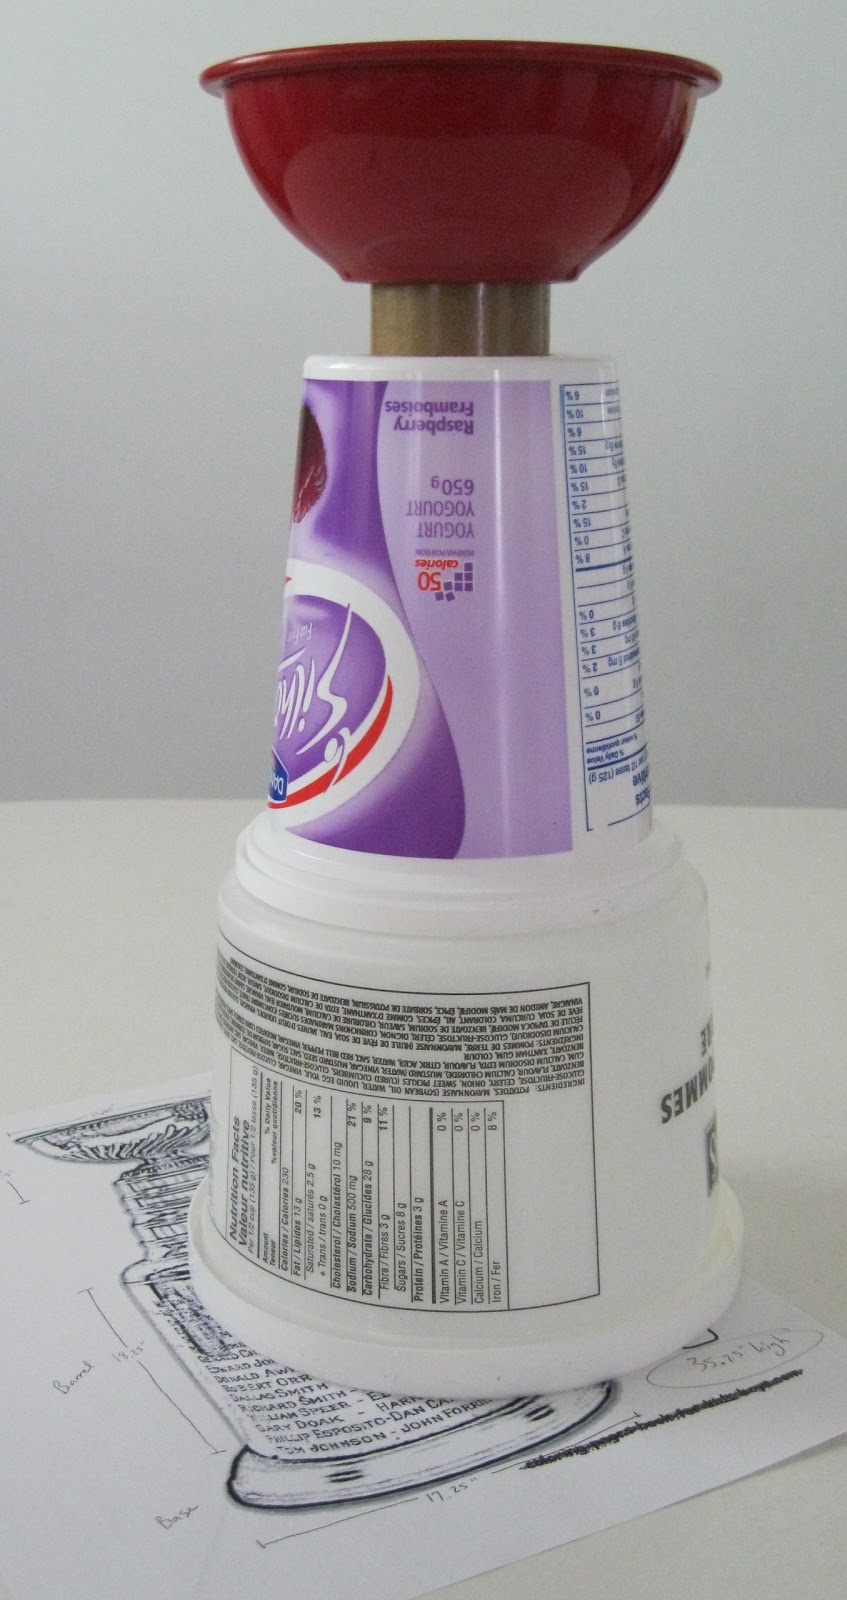
4. MINI STANLEY CUP: I printed off a simple picture of the Stanley Cup for reference, then stacked up two plastic containers (with lids on), a center piece from a roll of tape, and a little bowl. Once I was happy with the configuration, I drew 4 evenly spaced lines around each of the plastic containers and put a line of hot glue on these lines to create ridges. I also did a line of hot glue around the bottom edge of both containers. After stuffing the containers with balled up newspaper and chunks of cardboard to make them solid, I used more hot glue to seal the lid on and fill in the gap between the container and lid. I covered the individual parts with aluminum foil and foil tape, doing my best to keep it smooth on the two plastic containers but letting it be rough on the bowl to mimic the embossing on the real Cup. The last step was to use hot glue to stick the parts together.
5. PAPER ZAMBONI FAVOR BOXES: I designed a pattern for a paper zamboni and printed it on colored cardstock. After cutting and folding them, I secured the sides with staples (you could use glue or tape) and filled them with candy before tying a ribbon around them. These would be fun for older kids to color as a party activity. NOTE: I believe that Kinder Surprise, Eggtopia NHL Eggs and other similar chocolate eggs with toys inside will fit inside these. I filled them with mini chocolate bars.
6. CONCESSION SIGN & FOOD LABELS:
a. CONCESSION SIGN: I typed up the concession sign in Word, using black capital letters and red punctuation/numbers and printed it on white cardstock. I added pieces of a Coca-Cola box to the center page, then glued all three pages to a large piece of cardboard that I wrapped in black wrapping paper.
b. FOOD LABELS: I printed off the labels on white cardstock and drew/colored the pictures. After cutting them out, I glued them onto colored cardstock.
7. BANNERS: I printed out the letters in my son's name on colored card stock and cut them out in the shape of hanging banners (rectangle with the bottom 2 corners cut off to form an arrow shape). I glued these onto slightly larger pieces of colored cardstock, then strung them together on ribbon.
8. CUSTOM BOTTLES OF WATER: I set up a sheet of "labels" in Word that were as wide as I could make them and 1.88" high (5/sheet). I downloaded images of NHL team jerseys and inserted them into the labels, then typed my son's name and "1st BIRTHDAY" in a coordinating color. I printed them on regular white paper, cut them into strips, and attached them with a long strip of clear packing tape that covered the paper completely and was sticky at both ends to stick onto the bottle. I recommend removing the original label first.
9. NHL DRAFT BOARD: I printed a 1 (black printing on white background) and my son's full name (white printing with black "highlighting") on white cardstock and cut it out. I also printed the logos from the most recent NHL draft. I glued these to a large piece of black poster board. I also glued photos of my son to the board.
10. FOAM FINGER CAKE: I baked a 9"x13" cake and trimmed it in the shape of a foam finger, leaving the pointer finger quite wide to avoid having it break when I moved the cake to the tray. I decorated it with red and white icing and used a matching 1-shaped candle.
11. HOCKEY ICE TABLE: Since our kitchen table is a white oval, I used red and blue duct tape and red and white paper with clear mactac to create a rink on the top of it.
We own a lot of hockey memorabilia, jersey, blankets, etc., so I used those throughout our kitchen and living room to decorate.
- invitation = ticket
- cake = foam finger
- Oreos = hockey pucks
- sugar cookie hockey sticks and foam fingers
- arena food menu: pizza, hot dogs, burgers, popcorn, nachos, pretzels, chips
- foam finger pencil toppers and mini Zamboni souvenirs
- scoreboard
- custom water bottle labels and stickers on pop cans
- glass trays = ice
- silver bowls = the Cup
- first star selection
- first draft pick
- pendants banner
- replica Stanley Cup filled with silver candies
- hockey card "thank you"s
1. MINI FOAM FINGERS: I printed off a picture of a foam finger and traced it onto cardboard. After cutting it out of cardboard, I used it as my template to trace onto thin craft foam in various colors. I used Sharpies and paint markers to outline the shape and to write big number 1s on them. I rolled strips of foam into tubes and glued them to the backs, turning them into pencil toppers.
2. SCOREBOARD: I downloaded a picture of a scoreboard that I liked and edited on my computer to add my son's name, make the score 1-0, and make it the first period. I printed four copies of this. I covered an almost cube-shaped box with black wrapping paper, leaving the top open so I will be able to use it as a keepsake box later, then glued a scoreboard to each side. I added a picture from The Hockey News magazine to the bottom, some NHL team logo stickers around the sides, and string to the top so I could hang it from the ceiling.
3. SUGAR COOKIES:
a. HOCKEY STICKS: After rolling out the dough, I cut out simple hockey stick shapes with a knife, then decorated them with icing.
b. FOAM FINGERS: Using the same template as the craft foam fingers, I created my own cookie cutter from an aluminum baking pan, then used it to cut the shapes out of the dough. Each cookie was decorated with colored icing first, then had a number 1 added in white or chocolate icing.
4. MINI STANLEY CUP: I printed off a simple picture of the Stanley Cup for reference, then stacked up two plastic containers (with lids on), a center piece from a roll of tape, and a little bowl. Once I was happy with the configuration, I drew 4 evenly spaced lines around each of the plastic containers and put a line of hot glue on these lines to create ridges. I also did a line of hot glue around the bottom edge of both containers. After stuffing the containers with balled up newspaper and chunks of cardboard to make them solid, I used more hot glue to seal the lid on and fill in the gap between the container and lid. I covered the individual parts with aluminum foil and foil tape, doing my best to keep it smooth on the two plastic containers but letting it be rough on the bowl to mimic the embossing on the real Cup. The last step was to use hot glue to stick the parts together.
5. PAPER ZAMBONI FAVOR BOXES: I designed a pattern for a paper zamboni and printed it on colored cardstock. After cutting and folding them, I secured the sides with staples (you could use glue or tape) and filled them with candy before tying a ribbon around them. These would be fun for older kids to color as a party activity. NOTE: I believe that Kinder Surprise, Eggtopia NHL Eggs and other similar chocolate eggs with toys inside will fit inside these. I filled them with mini chocolate bars.
6. CONCESSION SIGN & FOOD LABELS:
a. CONCESSION SIGN: I typed up the concession sign in Word, using black capital letters and red punctuation/numbers and printed it on white cardstock. I added pieces of a Coca-Cola box to the center page, then glued all three pages to a large piece of cardboard that I wrapped in black wrapping paper.
b. FOOD LABELS: I printed off the labels on white cardstock and drew/colored the pictures. After cutting them out, I glued them onto colored cardstock.
7. BANNERS: I printed out the letters in my son's name on colored card stock and cut them out in the shape of hanging banners (rectangle with the bottom 2 corners cut off to form an arrow shape). I glued these onto slightly larger pieces of colored cardstock, then strung them together on ribbon.
8. CUSTOM BOTTLES OF WATER: I set up a sheet of "labels" in Word that were as wide as I could make them and 1.88" high (5/sheet). I downloaded images of NHL team jerseys and inserted them into the labels, then typed my son's name and "1st BIRTHDAY" in a coordinating color. I printed them on regular white paper, cut them into strips, and attached them with a long strip of clear packing tape that covered the paper completely and was sticky at both ends to stick onto the bottle. I recommend removing the original label first.
9. NHL DRAFT BOARD: I printed a 1 (black printing on white background) and my son's full name (white printing with black "highlighting") on white cardstock and cut it out. I also printed the logos from the most recent NHL draft. I glued these to a large piece of black poster board. I also glued photos of my son to the board.
10. FOAM FINGER CAKE: I baked a 9"x13" cake and trimmed it in the shape of a foam finger, leaving the pointer finger quite wide to avoid having it break when I moved the cake to the tray. I decorated it with red and white icing and used a matching 1-shaped candle.
11. HOCKEY ICE TABLE: Since our kitchen table is a white oval, I used red and blue duct tape and red and white paper with clear mactac to create a rink on the top of it.
We own a lot of hockey memorabilia, jersey, blankets, etc., so I used those throughout our kitchen and living room to decorate.
Sunday, August 12, 2012
DIY Shelf From Broken Hockey Sticks
MATERIALS
- 2 L-shaped shelf brackets
- screws
- tools
- strong glue
- pieces of hockey sticks (tape removed, washed, etc.)
1. Decide on the size of shelf, based on the size of the brackets, and determine how many pieces of stick are required and how long to cut them. Cut the sticks to length.
2. Lay the sticks out face down and side by side. Place the brackets on top. Screw the brackets to the 2 sticks that the holes line up on. Lift up the brackets and apply glue to the top, then place them back on the rest of the sticks. Put something heavy on the brackets until the glue is dry.
3. Once the glue is dry, screw the brackets to the wall. Use a level and use drywall plugs if you can't find studs. Glue on one last stick to fill in the gap at the back - mine had to be up on edge to fit. Use a piece of tape to hold it while the glue dries. DONE!
- 2 L-shaped shelf brackets
- screws
- tools
- strong glue
- pieces of hockey sticks (tape removed, washed, etc.)
1. Decide on the size of shelf, based on the size of the brackets, and determine how many pieces of stick are required and how long to cut them. Cut the sticks to length.
2. Lay the sticks out face down and side by side. Place the brackets on top. Screw the brackets to the 2 sticks that the holes line up on. Lift up the brackets and apply glue to the top, then place them back on the rest of the sticks. Put something heavy on the brackets until the glue is dry.
3. Once the glue is dry, screw the brackets to the wall. Use a level and use drywall plugs if you can't find studs. Glue on one last stick to fill in the gap at the back - mine had to be up on edge to fit. Use a piece of tape to hold it while the glue dries. DONE!
Monday, July 23, 2012
DIY Hockey Player Rock Art (Using a Broken Stick)
I've decided to dedicate one of my small flower beds to my favorite hockey team, the Edmonton Oilers. I have started gathering seeds/plants for blue and orange flowers, as well as blue and orange rocks to go around them. I will also include some broken hockey sticks as decoration and to keep the dog out of the flower bed.
It occurred to me to include a little hockey player in the bed, so I built an inukshuk, or rock person, using two round "leg" rocks, an oblong "body" rock, a round "head" rock, and a piece of aluminum hockey stick for "arms". I added a water-less Oilers logo tattoo to the "body" rock and a couple stickers on the "shoulders". I glued it all together using GOOP, and had to use a black pop bottle cap behind the legs to get it to balance properly, but I think it turned out pretty well.
Sunday, July 1, 2012
Happy Free Agency Day! Happy Canada Day!
To all my Canadian friends and family: Happy Canada Day!
To hockey fans worldwide: happy free agency day!
To all the NHL players who are now free agents: best of luck finding a new team! Hope everything goes well for you, the teams, and your families!
To hockey fans worldwide: happy free agency day!
To all the NHL players who are now free agents: best of luck finding a new team! Hope everything goes well for you, the teams, and your families!
Saturday, June 23, 2012
Interview with CBJ Forward Mark Letestu
Last night I had the pleasure of chatting with Columbus Blue Jackets (NHL) forward Mark Letestu, who was signing autographs at the minor hockey registration in Elk Point, AB (our hometown). I asked him about a variety of topics and here's what he had to say:
Me: Did you watch the NHL Draft today?
Mark: I think I got to pick 6 or pick 5 - Toronto just selected Morgan Rielly - so I saw a little bit of it [before I had to leave to come here]. A few trades, pretty exciting, seemed to be a good atmosphere in Pittsburgh.
Me: What do you think of Columbus' selection (defenseman Ryan Murray)?
Mark: I think they got the guy they wanted. It sounded like Murray was somebody they were happy with. Obviously the new coach (Associate Coach Hartsburg) coached him in junior so they had some background on him and by all accounts the [CBJ management] seem to think he's ready and someone we can rely on for help, which is great.
Me: Do you feel like this season you'll get to play a bigger role since you're not a rookie or "the new guy"?
Mark: I don't know. I'm hoping for a bigger role. In the last little bit of last season I played a big role, I played a lot of minutes, so I'm hoping to stay in that role, but we weren't a winning team last year and I expect them to make a lot of changes, to shuffle things up, to get a winning combination, so if [I end up in] a smaller role or a bigger role, I'm happy to be a part of it anyway.
Me: What are your expectations for yourself and for the team this season?
Mark: I think it's obvious to say that we want to be better than last place. [I hope] we give ourselves a chance at the end to be in the playoffs. We finished strong and we'd like to continue that, and hopefully it gives us a chance at one of those 8 spots. For myself, I'd like to get a healthy year. It's been two years now that I've been hurt at some point. I'd like to play all 82 games.
Me: What are you focusing on this summer?
Mark: It seems the cliche is [to say] to get stronger and faster - you're always trying to do those things - but this year I've been trying to loosen up a little bit. The injury prevention is big now. You're always getting stronger or quicker throughout the season but you're just trying to prevent injuries and hopefully have a strong year.
Me: How has becoming a father changed your game?
Mark: I don't know if it has changed my game a lot but it definitely changes the way you approach things. Obviously it's another person relying on you and your success. It's something [my wife] and I have talked about - wanting [our son] to see me as a hockey player, to hopefully stay in the league long enough that he gets to understand what dad does and hopefully he gets to experience a little bit of hockey and maybe take it up on his own.
Me: What are your thoughts on the new CBJ coaching staff?
Mark: I don't know them personally. I haven't had an opportunity to talk to any of them. I think obviously with the draft and free agency coming up, the current players kind of come after all that, so from what I've seen, they seem to be more than qualified. Craig has head coaching experience in the NHL and Keith will fill in that penalty killing role and really help there. We struggled on that this year. As many coaches on the bench as possible, with a young group, as many people teaching - if you can pick up a think or two along the way, it's great. I'm happy they brought in as many guys as they did.
Me: Are you tired of switching jersey numbers?
Mark: I didn't want to switch this last time. Probably the toughest part is [remembering to sign the correct number and] not screwing up somebody's hockey card. This time 10 wasn't available. I would have liked to stay with 10. At the time I think I was given 6, 12 or 17 to choose from and 17 seemed like the right one. I won't change it [back to 10 if it were available] now - somebody has probably bought [a CBJ jersey with 17] so [I'll stick with it].
Me: I see Tim Hortons is popular in Columbus - are you a fan?
Mark: I'm not a huge fan. I'll have it if I have to. But it's kind of a friendly reminder of where you're from.
Me: Are you on Twitter?
Mark: I am but I'm not "out there". I'm kind of under the radar. I like to get my baseball and my hockey news [on Twitter] but I don't like being followed. It seems like a lot of guys put themselves out there for some criticism and at the end of the day sometimes after a bad game you don't need to hear any of that.
Me: What is the best part of coming to an event like this?
Mark: It's pretty cool to see all the kids and to help minor hockey. I've always been proud of being from Elk Point so any chance I get to come back and help out, whether it's at a small level like this, just minor hockey, or any kind of event the town needs, it's just really gratifying and it's happy. It's a perfect compliment to the career.
Thanks again Mark for your time! Hope we can chat again next summer.
Wednesday, June 20, 2012
NHL Awards Done, Draft on Friday
I've never paid much attention to the NHL Awards - I usually disagree with the selections - but I tuned in for a bit since there were two Oilers players nominated this year (Eberle and Nugent-Hopkins). Alas, neither won, but I'm still proud of both of them for their great seasons and the nominations.
Now for the draft! The first round goes Friday and the rest of the rounds are on Saturday. I'll be tuning in to see who my Oilers select with their 3rd consecutive 1st-overall pick. I read a great article about top prospect Nail Yakupov, so I won't mind if they take him, but I'd really like them to take one of the great Canadian defensemen. I guess I'll see what happens Friday.
Wednesday, June 13, 2012
DIY Custom Keyboard - NHL Team Logos
Using my favorite magazine, The Hockey News, and some packing tape, I customized my keyboard with NHL team logos. You can do it with any magazine or laser-printed pictures you like. It's easy and durable but shouldn't damage your keys if you ever want to remove it. It would be fun to do with a large picture that's cut into key-sized pieces, especially on a white keyboard. You could also do large letters if you have trouble reading your keys.
MATERIALS:
- magazine
- packing tape
- scissors
- dish of warm water
- keyboard
1. Cut out the pictures slightly smaller than the keys.
2. Stick packing tape to the fronts and rub it down so it's stuck really well.
3. Soak the tape in warm water and gently rub the paper off the back, leaving just the ink on the tape. Let dry.
4. Trim around the pictures, leaving a thin edge of tape. Stick onto your keys. DONE!
MATERIALS:
- magazine
- packing tape
- scissors
- dish of warm water
- keyboard
1. Cut out the pictures slightly smaller than the keys.
2. Stick packing tape to the fronts and rub it down so it's stuck really well.
3. Soak the tape in warm water and gently rub the paper off the back, leaving just the ink on the tape. Let dry.
4. Trim around the pictures, leaving a thin edge of tape. Stick onto your keys. DONE!
Monday, June 11, 2012
30 NHL Team Pocket Schedule Project
I've been working on this post for months and will continue to update it as responses come in, but since the season is now over (congratulations to the LA Kings on their first Stanley Cup), I thought I'd post it.
As the 2011-12 NHL season began to wind down, I had an idea: since my son was born at the beginning of the season, I would try to collect pocket schedules from all 30 teams for his keepsake box. I went on the teams' websites to find their contact information and any specifications for requesting pockets schedules and/or fan packs. Some teams accept e-mail requests, some require a SASE, and some don't give any information, so I just hand-wrote them a nice letter and fired it in the mail. Here is what I got back:
Anaheim Ducks: 1 pocket schedule, 1 player card, 2 decals
Boston Bruins:
Buffalo Sabres: 1 pocket schedule, 1 magnet, 1 window decal
Calgary Flames: 3 player cards, 6 stickers
Carolina Hurricanes: 1 sticker, 2 tattoos, 2 cards
Chicago Blackhawks:
Colorado Avalanche: 4 pocket schedules
Columbus Blue Jackets:
Dallas Stars: 1 pocket schedule, 1 player card
Detroit Red Wings: 1 tattoo, 1 sticker, 1 decal, 2 player cards
Edmonton Oilers:
Florida Panthers: 3 pocket schedules
Los Angeles Kings:
Minnesota Wild:
Montreal Canadiens: 5 player cards, 1 sticker
Nashville Predators: 1 pocket schedule
New Jersey Devils: 2 pocket schedules
New York Islanders:
New York Rangers: 4 pocket schedules, 4 wallet card schedules
Ottawa Senators: e-mailed to inform me that they did not produce a paper schedule
Philadelphia Flyers:
Phoenix Coyotes: 2 pocket schedules
Pittsburgh Penguins: 2 pocket schedules
San Jose Sharks: 1 pocket schedule, 1 magnet, 1 sticker, 3 tattoos, 5 cards
St. Louis Blues: 3 pocket schedules, 2 decals
Tampa Bay Lightning:
Toronto Maple Leafs:
Vancouver Canucks: 5 players cards, 1 decal
Washington Capitals:
Winnipeg Jets:
As the 2011-12 NHL season began to wind down, I had an idea: since my son was born at the beginning of the season, I would try to collect pocket schedules from all 30 teams for his keepsake box. I went on the teams' websites to find their contact information and any specifications for requesting pockets schedules and/or fan packs. Some teams accept e-mail requests, some require a SASE, and some don't give any information, so I just hand-wrote them a nice letter and fired it in the mail. Here is what I got back:
Anaheim Ducks: 1 pocket schedule, 1 player card, 2 decals
Boston Bruins:
Buffalo Sabres: 1 pocket schedule, 1 magnet, 1 window decal
Calgary Flames: 3 player cards, 6 stickers
Carolina Hurricanes: 1 sticker, 2 tattoos, 2 cards
Chicago Blackhawks:
Colorado Avalanche: 4 pocket schedules
Columbus Blue Jackets:
Dallas Stars: 1 pocket schedule, 1 player card
Detroit Red Wings: 1 tattoo, 1 sticker, 1 decal, 2 player cards
Edmonton Oilers:
Florida Panthers: 3 pocket schedules
Los Angeles Kings:
Minnesota Wild:
Montreal Canadiens: 5 player cards, 1 sticker
Nashville Predators: 1 pocket schedule
New Jersey Devils: 2 pocket schedules
New York Islanders:
New York Rangers: 4 pocket schedules, 4 wallet card schedules
Ottawa Senators: e-mailed to inform me that they did not produce a paper schedule
Philadelphia Flyers:
Phoenix Coyotes: 2 pocket schedules
Pittsburgh Penguins: 2 pocket schedules
San Jose Sharks: 1 pocket schedule, 1 magnet, 1 sticker, 3 tattoos, 5 cards
St. Louis Blues: 3 pocket schedules, 2 decals
Tampa Bay Lightning:
Toronto Maple Leafs:
Vancouver Canucks: 5 players cards, 1 decal
Washington Capitals:
Winnipeg Jets:
Friday, June 1, 2012
DIY Zamboni (Papercraft)
I designed this to use as party favor boxes with the intention of having kids color and asssemble them. I printed them on different colored cardstock.
Tuesday, May 29, 2012
DIY Mini Stanley Cup Replica
'Tis the season... for fan-made Stanley Cups to make their appearances at parties, parades, and arenas. Here's how I made mine, which is about half the size of the real cup and MUCH lighter.
MATERIALS:
- plastic containers
- small bowl
- center piece from a roll of tape
- aluminum foil
- aluminum foil tape
- hot glue gun and glue sticks
- ruler
- marker
- cardboard scraps
- newspaper
1. I printed off a simple picture of the Stanley Cup for reference, then stacked up two plastic containers (with lids on), a center piece from a roll of tape, and a little bowl.
2. Once I was happy with the configuration, I drew 4 evenly spaced lines around each of the plastic containers and put a line of hot glue on these lines to create ridges. I also did a line of hot glue around the bottom edge of both containers.
3. After stuffing the containers with balled up newspaper and chunks of cardboard to make them solid, I used more hot glue to seal the lid on and fill in the gap between the container and lid.
4. I covered the individual parts with aluminum foil and foil tape, doing my best to keep it smooth on the two plastic containers but letting it be rough on the bowl to mimic the embossing on the real Cup. The last step was to use hot glue to stick the parts together. I used two circles of cardboard covered in aluminum foil - one between the tape roll and the purple container and another on the very bottom. DONE!
The top of the cup can be used as a bowl for serving silver-wrapped candies at a party or holding a beloved souvenir from your favorite team as a good luck charm for the playoffs. What other uses can you think of? I'd love to hear your ideas and see photos of your creations.
Thursday, May 24, 2012
DIY Hockey Puck Baby Toy
I've seen these shaped as cubes and balls, but the basic idea is a soft toy with tags sticking out for babies to chew on, and since I love hockey, I decided to make one shaped like a hockey puck for my son.
MATERIALS:
- black fabric
- thread, sewing machine, notions
- ribbon, tags, patches, etc.
- stuffing
- crinkly plastic (optional)
- rattle (optional) *I used 2 buttons inside a tiny plastic container that I glued shut and sewed into its own fabric pouch.
1. If you are making a rattle to go inside the puck, start by making that. I used a scrap of fabric that I sewed on three sides before inserting the rattle and hand sewing closed.
2. Cut out two circles of black fabric. Measure around them and cut a strip that length plus seam-allowance and sew it end-to-end.
3. If you want to sew a patch on, do it now. Lay one circle on your work surface right side up. Place several ribbons/tags on top of the circle with the ends that you want sticking out aimed into the center. Carefully place the strip of black face down on top of the tags and pin in place. Sew around the circle, backstitching at least once every time you cross a tag/ribbon.
4. Add another layer of tags/ribbons to the strip and top this with the other circle. Pin together and sew almost all the way around, leaving a space for turning.
5. Turn the puck right side out and stuff it with crinkly plastic, stuffing, rattle, more stuffing, and more plastic.
6. Sew up the opening. DONE!
MATERIALS:
- black fabric
- thread, sewing machine, notions
- ribbon, tags, patches, etc.
- stuffing
- crinkly plastic (optional)
- rattle (optional) *I used 2 buttons inside a tiny plastic container that I glued shut and sewed into its own fabric pouch.
2. Cut out two circles of black fabric. Measure around them and cut a strip that length plus seam-allowance and sew it end-to-end.
3. If you want to sew a patch on, do it now. Lay one circle on your work surface right side up. Place several ribbons/tags on top of the circle with the ends that you want sticking out aimed into the center. Carefully place the strip of black face down on top of the tags and pin in place. Sew around the circle, backstitching at least once every time you cross a tag/ribbon.
4. Add another layer of tags/ribbons to the strip and top this with the other circle. Pin together and sew almost all the way around, leaving a space for turning.
5. Turn the puck right side out and stuff it with crinkly plastic, stuffing, rattle, more stuffing, and more plastic.
6. Sew up the opening. DONE!
I have NO idea why EVERY picture came up sideways. I've been trying to post this for a week now and I'm finally just posting it with the pictures sideways because I can't get them to work properly.
Thursday, April 19, 2012
Stanley Cup Party
Even though my team didn't make the playoffs this year, there's always next year. Until then, I can still dream about the Stanley Cup party I'll throw, and I'll share my ideas with you in case your team is still in the running (or you'd like to dream about next season too).
Serving bowls: silver like the Cup
Platters/trays: glass to look like ice
Coasters: pucks or circles of black felt/foam
For decorations, use temporary hooks, like 3M Command hooks, and coat hangers to display jerseys, banners, and flags on your walls. Add your team's logo to things with stickers or print it out and glue or tape it on. Ribbon can also be tied around things to add color.
You can label cups or wine glasses with player names/numbers so that guests can tell them apart. You can also cover or replace the labels on bottles to look like jerseys.
For activities and games, I recommend keeping actual hockey or street hockey OUTSIDE to avoid damaging things in your house. Air/table hockey would be appropriate, and there are lots of hockey trivia games and NHL themed board games like Monopoly.
Many things are available in your team colors: table cloths, napkins, plates, cups, streamers, drinks, Jello, icing for cookies/cupcakes, candies... For other snacks/flavors, I've been thinking by color:
Red
- strawberries
- raspberries
- red licorice
- salsa
- watermelon
- tomatoes
- red delicious apples
- garlic sausage, pepperoni sticks
- cherries
- cranberry
- ketchup chips
Orange
- cheddar cheese
- cheesies
- cheese nachos
- carrot sticks
- cantaloupe
- crackers
- chips
- orange slices
- peach
Yellow
- chips
- golden delicious apples
- yellow pears
- crackers
- bananas
- lemon
- nachos
- buttered popcorn
Green
- pickles
- melon
- broccoli
- celery
- green apples
- green grapes
- lime
- kiwi
- guacamole/avocado
- mint
Blue
- blueberries
- blue raspberry
- bubblegum
- blue cheese
Purple/Maroon
- saskatoons
- red/purple grapes
- black cherry
Black/Brown
- black licorice
- dark and milk chocolate
- chocolate pudding
- chocolate cake
- chocolate ice cream
- Oreos
- pretzels
White
- vanilla ice cream
- whipped cream
- mozza cheese
- white chocolate
- popcorn
- crackers
- chips
- white cake
- cheesecake
- nachos
Don't forget to decorate your garbage can with the opposing team's colors and logo. ;-)
Serving bowls: silver like the Cup
Platters/trays: glass to look like ice
Coasters: pucks or circles of black felt/foam
For decorations, use temporary hooks, like 3M Command hooks, and coat hangers to display jerseys, banners, and flags on your walls. Add your team's logo to things with stickers or print it out and glue or tape it on. Ribbon can also be tied around things to add color.
You can label cups or wine glasses with player names/numbers so that guests can tell them apart. You can also cover or replace the labels on bottles to look like jerseys.
For activities and games, I recommend keeping actual hockey or street hockey OUTSIDE to avoid damaging things in your house. Air/table hockey would be appropriate, and there are lots of hockey trivia games and NHL themed board games like Monopoly.
Many things are available in your team colors: table cloths, napkins, plates, cups, streamers, drinks, Jello, icing for cookies/cupcakes, candies... For other snacks/flavors, I've been thinking by color:
Red
- strawberries
- raspberries
- red licorice
- salsa
- watermelon
- tomatoes
- red delicious apples
- garlic sausage, pepperoni sticks
- cherries
- cranberry
- ketchup chips
Orange
- cheddar cheese
- cheesies
- cheese nachos
- carrot sticks
- cantaloupe
- crackers
- chips
- orange slices
- peach
Yellow
- chips
- golden delicious apples
- yellow pears
- crackers
- bananas
- lemon
- nachos
- buttered popcorn
Green
- pickles
- melon
- broccoli
- celery
- green apples
- green grapes
- lime
- kiwi
- guacamole/avocado
- mint
Blue
- blueberries
- blue raspberry
- bubblegum
- blue cheese
Purple/Maroon
- saskatoons
- red/purple grapes
- black cherry
Black/Brown
- black licorice
- dark and milk chocolate
- chocolate pudding
- chocolate cake
- chocolate ice cream
- Oreos
- pretzels
White
- vanilla ice cream
- whipped cream
- mozza cheese
- white chocolate
- popcorn
- crackers
- chips
- white cake
- cheesecake
- nachos
Don't forget to decorate your garbage can with the opposing team's colors and logo. ;-)
Tuesday, March 20, 2012
DIY Turn a Broken Hockey Stick into a Keepsake
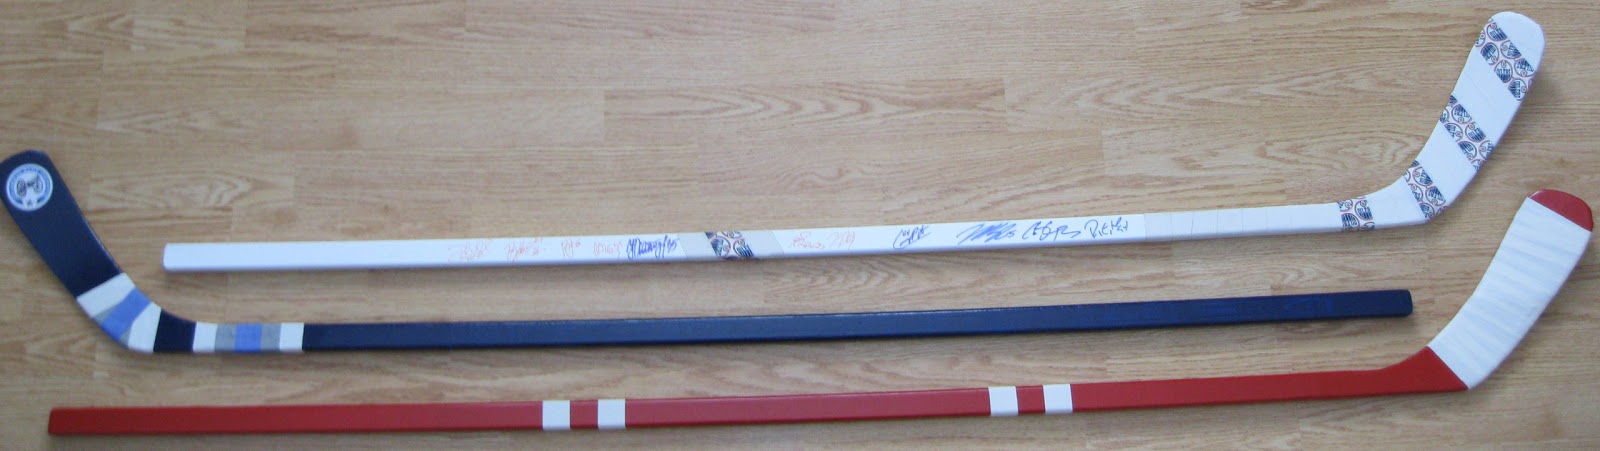
I got this idea last summer when I was at an autograph session and saw a guy with a completely white hockey stick with a small Oilers logo on the blade. In my collection of broken hockey sticks I had several that were complete sticks with broken blades, so I decided to "repair" them.
MATERIALS:
- hockey stick (tape/stickers removed, washed)
- strong glue
- spray paint
- hockey tape
- stickers/decals
- acrylic craft paint
1. Use glue and tape to put your broken stick back together.
2. Spray paint the entire stick the color of your choice.
3. Wrap hockey tape around your repaired areas to hide them. You can use tape with a design on it or paint the tape with acrylic craft paint (stick the tape on a plastic container and paint it before you wrap it on the stick). Add decals if desired.
a. On the white stick, I used tape with Oilers logos on it - 5 strips, one for each Stanley Cup.
b. On the blue stick, I painted the tape to match the CBJ third jersey's stripes and added a decal on the blade.
c. On the red stick, I stuck with just plain tape, again mimicking the jersey stripes, and will add a Team Canada decal on the tape on the blade.
*If you plan to get autographs on the stick, test your marker on a spot where you will be adding tape or a decal. You want the marker to show up well, write easily, and dry quickly. I recommend Sharpies.
MATERIALS:
- hockey stick (tape/stickers removed, washed)
- strong glue
- spray paint
- hockey tape
- stickers/decals
- acrylic craft paint
1. Use glue and tape to put your broken stick back together.
2. Spray paint the entire stick the color of your choice.
3. Wrap hockey tape around your repaired areas to hide them. You can use tape with a design on it or paint the tape with acrylic craft paint (stick the tape on a plastic container and paint it before you wrap it on the stick). Add decals if desired.
a. On the white stick, I used tape with Oilers logos on it - 5 strips, one for each Stanley Cup.
b. On the blue stick, I painted the tape to match the CBJ third jersey's stripes and added a decal on the blade.
c. On the red stick, I stuck with just plain tape, again mimicking the jersey stripes, and will add a Team Canada decal on the tape on the blade.
*If you plan to get autographs on the stick, test your marker on a spot where you will be adding tape or a decal. You want the marker to show up well, write easily, and dry quickly. I recommend Sharpies.
Tuesday, March 6, 2012
A Shoebox Full of Trading Cards
It's not an unusual sight; shoeboxes full of trading cards are common in basements, closets, attics, and garages across North America. My house is no different, I have several shoeboxes full of hockey cards, but I also have one very special shoebox.
This box is going to bring smiles to the faces of kids. This box is full of carefully repackaged cards that I'm going to give to a local children's hospital or charity. I was inspired by Cards 2 Kids, an organization started by a teenager to give sports cards to sick kids. I knew that between my own collection and the cards I had acquired at garage sales, that I could do something similar myself. I got a bunch of zipper bags at a dollar store and sorted through my cards, making up packages that contained an even mix of modern and retro cards, rookies and stars, current and former Edmonton Oilers, and, of course, lots of Upper Deck cards (because they're my favorite). I also packaged up some of the non-sports trading cards that I had.
My next step is to contact some local hospitals and charities to arrange for the distribution of the cards. I'll let you know how it goes.
This box is going to bring smiles to the faces of kids. This box is full of carefully repackaged cards that I'm going to give to a local children's hospital or charity. I was inspired by Cards 2 Kids, an organization started by a teenager to give sports cards to sick kids. I knew that between my own collection and the cards I had acquired at garage sales, that I could do something similar myself. I got a bunch of zipper bags at a dollar store and sorted through my cards, making up packages that contained an even mix of modern and retro cards, rookies and stars, current and former Edmonton Oilers, and, of course, lots of Upper Deck cards (because they're my favorite). I also packaged up some of the non-sports trading cards that I had.
My next step is to contact some local hospitals and charities to arrange for the distribution of the cards. I'll let you know how it goes.
Monday, February 20, 2012
DIY Hockey Stick Headboard
This is a great project for hockey fans who hate to see things go to waste.
MATERIALS:
- broken hockey sticks (I used 8 blades and 4 pieces of shaft)
- tools (saw, drill, sander)
- tape measure
- screws
- hockey tape, hockey stickers (optional)
1. Measure your space, collect the sticks, and draw up a plan of what you want the headboard to look like. An equal number of left and right blades is required to make both sides match. Keep in mind where the tips of the blades on the outside edges will be.
I used 4 left and 4 right blades in varied lengths spaced 2" - 3" apart and 4 shafts (2 at my maximum length, 2 shorter) spaced 1.5" apart. I also lined up one of my blades so that its shaft would be on a stud in the wall where I wanted to put my headboard.
2. Remove all tape/stickers/residue from the sticks and wash them. If you like the look of the tape on them, add clean tape after removing the old tape and washing the sticks - the old tape will be covered in dirt, sweat, bugs, and all sorts of other things you don't want in the bedroom. Be careful with the broken ends, as they can be sharp and could give you slivers.
3. Lay the sticks out according to your plan. I put the shafts in front of the blades. Mark where you need to cut off ends and drill holes in order to screw the shafts to the blades.
4. Trim the ends and sand them to prevent sharp edges and slivers. Drill holes in the pieces that are going on top/in front (in my case, the shafts). Lay them on top of the other pieces (blades) and mark where they need to be drilled. Drill them. Also drill holes for screwing the completed headboard to the wall.
5. Screw the pieces together. I used 1.25" screws.
6. OPTIONAL: Decorate the sticks with hockey tape and stickers. I also used tattoos, which provided a really neat effect. Wrap the ends of the sticks with hockey tape as added protection against sharp edges and slivers. You can also add more stickers later.
7. Attach your headboard to the wall. DONE!
Thanks to my Dad for all his help with this project and to Doug and Scott for the sticks.
MATERIALS:
- broken hockey sticks (I used 8 blades and 4 pieces of shaft)
- tools (saw, drill, sander)
- tape measure
- screws
- hockey tape, hockey stickers (optional)
1. Measure your space, collect the sticks, and draw up a plan of what you want the headboard to look like. An equal number of left and right blades is required to make both sides match. Keep in mind where the tips of the blades on the outside edges will be.
I used 4 left and 4 right blades in varied lengths spaced 2" - 3" apart and 4 shafts (2 at my maximum length, 2 shorter) spaced 1.5" apart. I also lined up one of my blades so that its shaft would be on a stud in the wall where I wanted to put my headboard.
2. Remove all tape/stickers/residue from the sticks and wash them. If you like the look of the tape on them, add clean tape after removing the old tape and washing the sticks - the old tape will be covered in dirt, sweat, bugs, and all sorts of other things you don't want in the bedroom. Be careful with the broken ends, as they can be sharp and could give you slivers.
3. Lay the sticks out according to your plan. I put the shafts in front of the blades. Mark where you need to cut off ends and drill holes in order to screw the shafts to the blades.
4. Trim the ends and sand them to prevent sharp edges and slivers. Drill holes in the pieces that are going on top/in front (in my case, the shafts). Lay them on top of the other pieces (blades) and mark where they need to be drilled. Drill them. Also drill holes for screwing the completed headboard to the wall.
5. Screw the pieces together. I used 1.25" screws.
6. OPTIONAL: Decorate the sticks with hockey tape and stickers. I also used tattoos, which provided a really neat effect. Wrap the ends of the sticks with hockey tape as added protection against sharp edges and slivers. You can also add more stickers later.
7. Attach your headboard to the wall. DONE!
Thanks to my Dad for all his help with this project and to Doug and Scott for the sticks.
Subscribe to:
Posts (Atom)