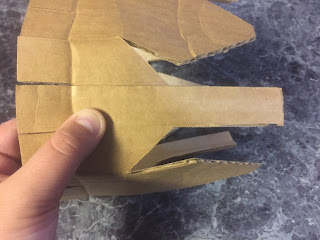
I wanted to make a special hat to wear on Canada Day but I couldn't come up with any ideas, so I hopped on Pinterest and searched "Canada hat" for inspiration. Unsurprisingly, the two most common results were toques (knit caps) and Mountie hats (RCMP Biltmore campaign hats). Since you rarely need a toque here on Canada Day, I decided to try my hand at creating a Mountie hat out of cardboard.
Light brown cardboard is the perfect material to use, since it's already the correct color and is sturdy enough to hold the shape while being pliable enough to form. The crown is a bit tricky, but if I can do it, you can.
The shape of these hats is designed to block sunlight and repel rain, but I would recommend trying to waterproof the cardboard with clear acrylic spray before you wear it in a downpour. This can be done once the hat is assembled. You can also paint the hat any color that you prefer, especially if you want to wear it for part of a drill sergeant or state trooper costume.
MATERIALS
- cardboard sheets
- white glue
- glue gun, glue sticks
- ruler, pencil
- exacto knife, scissors
- ribbon
- items to decorate the completed hat (fake leaves, stickers, patches, etc.) - optional
1. Cut a strip of cardboard 6" wide by 25" long.
NOTE: This size will fit most adults and teenagers, but it sits a bit high on your head. To make it a different size, adjust the measurements while keeping the same proportions.
Also, if I make another hat, I plan to do it 7" wide instead of 6" and make the lines in step 2.A at 1" and 3" instead. This will make the hat an inch taller
2. Measure and mark the following lines/points:
A. horizontal lines 1" and 2" from the bottom edge
B. vertical lines every inch across the bottom edge up to the 1" horizontal line
C. vertical lines 3" down from the top edge at: 1", 6", 7", 12", 13", 18", 19", 24"
D. 45 degree angled lines down from the bottom points of the 3" lines (C) to the horizontal line 2" up from the bottom edge at: 2", 5", 8", 11", 14", 17", 20", 23"
E. angled lines from the top point of C to the bottom point of D
F. mark the point on E that is 1 3/8" from the bottom of the line, then draw a line that is 3" long from that point angled up to the top edge.
(You can erase the excess part of E or just ignore it when you're cutting).
3. Cut lines B, C, D, E, and F. Fold both A lines.
4. Bend the strip into a ring with the ends overlapping 1". Cut off one of the 1" squares that are overlapped.
5. Glue the overlapping areas together. I prefer white glue for this, held in place with binder clips while drying. Allow to dry thoroughly.
6. Use a glue gun to glue D to E and C to F. Glue two, glue the two opposite, then glue in between. The centers of the "diamond" sections should be pushed in slightly and the narrow sections should bow out slightly.
8. Cut two 14" or 16" diameter circles from cardboard. (I did 16" but if I make another one I think I'll use 14".)
9. Place the top of the hat centered on one of the circles and mark the 8 corners where the 1" squares leave a triangular gap. Make small reference marks on the crown and brim so you can get it lined up correctly after you cut it. (I forgot to do this and trust me, you'll be happy you did it.)
Move the top of the hat. Draw lines between the 8 points to form an octagon.
Cut out the octagon.
10. Slide the circle with the octagon cut out over the top of the hat and check that it fits down flat over the sides and covers the 1" squares. Adjust if necessary.
11. Remove the brim and place it on the other circle. Trace the octagon onto the other circle and make a reference mark on the other circle. Cut out the octagon slightly smaller than the first one. I also rounded the corners a bit.
12. Glue gun the first circle in place to the top of the 1" squares. Glue the second circle to the bottom of the 1" squares and the bottom of the first circle.
13. Now it's time to decorate the hat. If you want to waterproof it or paint it, do that now.
Mountie hats have a medium brown hat band with a buckle, but I chose to glue gun on a red ribbon instead.
14. Add any other decorations that you like. I glued on some fake red maple leaves.
DONE.
I think this would be a fun table center for a party too. What else do you think it would be good for?


No comments:
Post a Comment