Monday, November 27, 2017

DIY Recycled Pallet Trees


'Tis the season for holiday decorations and these trees made from recycled pallets (or other scrap pieces of wood) are a great addition to your holiday decor. You can customize these to fit your style and color scheme, and they make great gifts too.

The possibilities are really endless when it comes to personalizing these trees. You can paint the "branches" whatever color you like (white, silver, light green, dark green, etc.), add wood slice "ornaments" in various colors, paint on your family name or a winter greeting, or even add Christmas lights.

You will need access to power tools (and/or someone who'll do some wood cutting for you) for this project. And always remember your proper safety gear when working with power tools.

MATERIALS
- pallets or other scrap wood
- paint
- saw
- drill/screwdriver, screws
- tape measure, pencil

1. Disassemble the pallets and remove all nails from the boards.


2. Measure and cut your boards to the desired lengths. You'll need one long one for the tree "trunk" and three to five of various lengths (between 6" and 18", as desired) for the "branches".

Sand and paint your "branches" (and "trunk", if desired). Lay them on your "trunk" and make sure you're happy with the layout.


3. Screw the "branches" to the "trunk".


4. If desired, cut out a star for the top of the tree. Sand and paint it, then screw it on to the top "branch".


5. Stand your beautiful new tree(s) in the snow, tie or screw them to your fence, or stick them in a heavy plant pot. DONE!

Monday, November 20, 2017

Decorated Jars with Ribbon


Our basement bathroom doesn't get a lot of use unless we have guests staying over, but I like to keep a few things like Q-tips, nail clippers, etc. in there. I wasn't happy with the storage containers that I have been using, so I decided to decorate some baby food jars to use instead.

You can decorate any size/shape/type of jars that you prefer and it's easy to customize them to whatever your theme or color scheme is. These also make cute gifts, both empty or filled with candies, baking, or whatever you like.

Hopefully I can give you enough ideas to get inspired to customize your own jars. There are a million ways to decorate them, but here's what I did.

MATERIALS
- clean, dry jars with lids
- glue gun
- scissors
- ribbon
- contact paper or similar

1. Make sure your jars and lids are thoroughly washed and dried. Remove any labels and as much glue as possible.


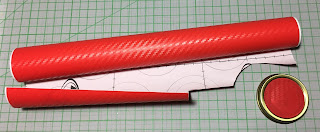
2. If there is writing on your lid and/or you don't like the color of it, you can either spray paint it or cover it. I chose to cover mine. I cut a circle of contact paper and applied it to the top of the lid.


3. My lid had writing on the sides too, so I used my glue gun to attach ribbon to the sides to cover the writing.


Now the lid is done.


4. To add ribbon to the jar, decide how you'd like the ends to be finished. For some jars I cut the ribbons slightly longer than the distance around the jar and glued the ends flat, just like on the lid. Choose which side will be the "back" of the jar and glue one end of the ribbon there, add glue all the way around in sections and press the ribbon to the glass, finishing by overlapping the ribbon slightly where you started.

For other jars, I cut the ribbons about 8 inches longer than the distance around the jar and tied the ends in a square knot, then trimmed them. (You could also cut the ribbon even longer and tie a knot and bow.)

Start by gluing the middle of the ribbon to the "back" of the jar.


5. Bring the ends around to the front and tie them into a square knot (left over right and under, right over left and under). Add a dab of glue under the knot to keep it in place.


6. Trim the ends of the ribbons. Put the lid back on. DONE.


Have fun creating a variety of beautiful jars and filling them with fun and useful things.


The possibilities are endless!

Sunday, November 12, 2017

Add a Hanging Loop to a Kitchen Towel


I love having my kitchen towels hanging off my stove door, ready to use. Being a high-traffic area though, someone was always knocking a towel onto the floor. My mother and I came up with this solution: sew on a hanging loop.

This sewing can be done my machine or by hand and is a quick and easy way to make hanging your towels much easier. You can also customize some towels as a gift for someone for a house-warming, wedding, shower, birthday, or Christmas. I also did this on the towels in our holiday trailer so that I can easily hang them on the cupboard knobs.

My kitchen is mostly red and white, so I chose tape and ribbon in those colors. I love ladybugs and managed to find grosgrain ribbon with ladybugs on it. It looks adorable with my ladybug hand towels. I also have some towels with a red and black ribbon and some with white twill tape.

MATERIALS
- towel
- twill tape or ribbon
- thread
- scissors
- measuring tape
- sewing notions

1. Cut the twill tape or ribbon approximately 8" long.


2. Fold under 1" on each end of the tape/ribbon.


3. Center the tape/ribbon on the edge of the towel just below the hem. This will be the top of the towel when it's hanging.

4. Sew the ends of the tape/ribbon to the towel. DONE.


Now you just hang the end with the loop over wherever you want to hang the towel and tuck the other end through your newly-sewn loop. Enjoy the convenience of your towels being exactly where you need them or get a kick start on your holiday gift preparation.


Sunday, November 5, 2017

Pony Pinata


Wondering what to do with all that leftover Halloween candy? Here's a fun little project that will take care of that for you: a pony pinata. This technique can be adapted to make other shapes and animals too.

As I've said before, pinatas are great at birthday parties. Kids love them and adults get the enjoyment of watching the kids bash them and collect the goodies. My niece's birthday is coming up soon, so I'm making this pinata as part of her birthday gift from me. As long as you use candy that will last, pinatas can be made well ahead of time.

Pinatas are also a lot of fun at other events where kids will be present. They are both a fun activity and a great way to give candy and small toys/items. Add a real "bang" to your New Years Eve celebration, some genuine Mexican flair to a Cinqo de Mayo (May 5th) bash, or some extra "pop" to a family reunion.

MATERIALS
- cardboard
- tissue paper
- string
- marker or pencil
- scissors, exacto knife
- glue gun, sticks
- white glue
- candy, toys, hair accessories, other goodies for inside the pinata

1. Decide on the shape and draw it on a piece of cardboard. Keep the lines fairly straight and the design simple.


2. Cut out the shape. Flip it over and trace around it on another piece of cardboard. Cut out the second piece.


3. Cut a bunch of strips of cardboard. Mine were 3" wide.


4. Use the glue gun to glue the strips vertically along the edges of the pony shape. I didn't do the ear.


5. Fill the pinata with goodies.


6. Cut a bunch of tissue paper strips approximately 2" wide.


7. Snip along one side of the strips approximately 1" deep with approximately 1" spacing. This creates a "fringe".


8. Starting with the stomach and bottoms of the feet, white glue the non-fringed edge of the tissue paper strips to the pinata. 


9. Continue working from the bottom towards the top, overlapping the strips about 1".


10. Continue until you have the entire pinata covered.


11. I added some strips to the back end the look like a tail.


12. Carefully poke holes through both sides of the pinata centered along the back at approximately 1" down from the top edge.


13. Cut a 6' piece of string and feed it through the holes. I used a piece of wire to do this. Tie the ends of the string together. I also tied another knot about 6" up from the pinata.


DONE! Have fun watching the kids smash all your hard work. ;-)