Tuesday, May 29, 2012

DIY Mini Stanley Cup Replica


'Tis the season... for fan-made Stanley Cups to make their appearances at parties, parades, and arenas. Here's how I made mine, which is about half the size of the real cup and MUCH lighter.

MATERIALS:
- plastic containers
- small bowl
- center piece from a roll of tape
- aluminum foil
- aluminum foil tape
- hot glue gun and glue sticks
- ruler
- marker
- cardboard scraps
- newspaper

1. I printed off a simple picture of the Stanley Cup for reference, then stacked up two plastic containers (with lids on), a center piece from a roll of tape, and a little bowl.


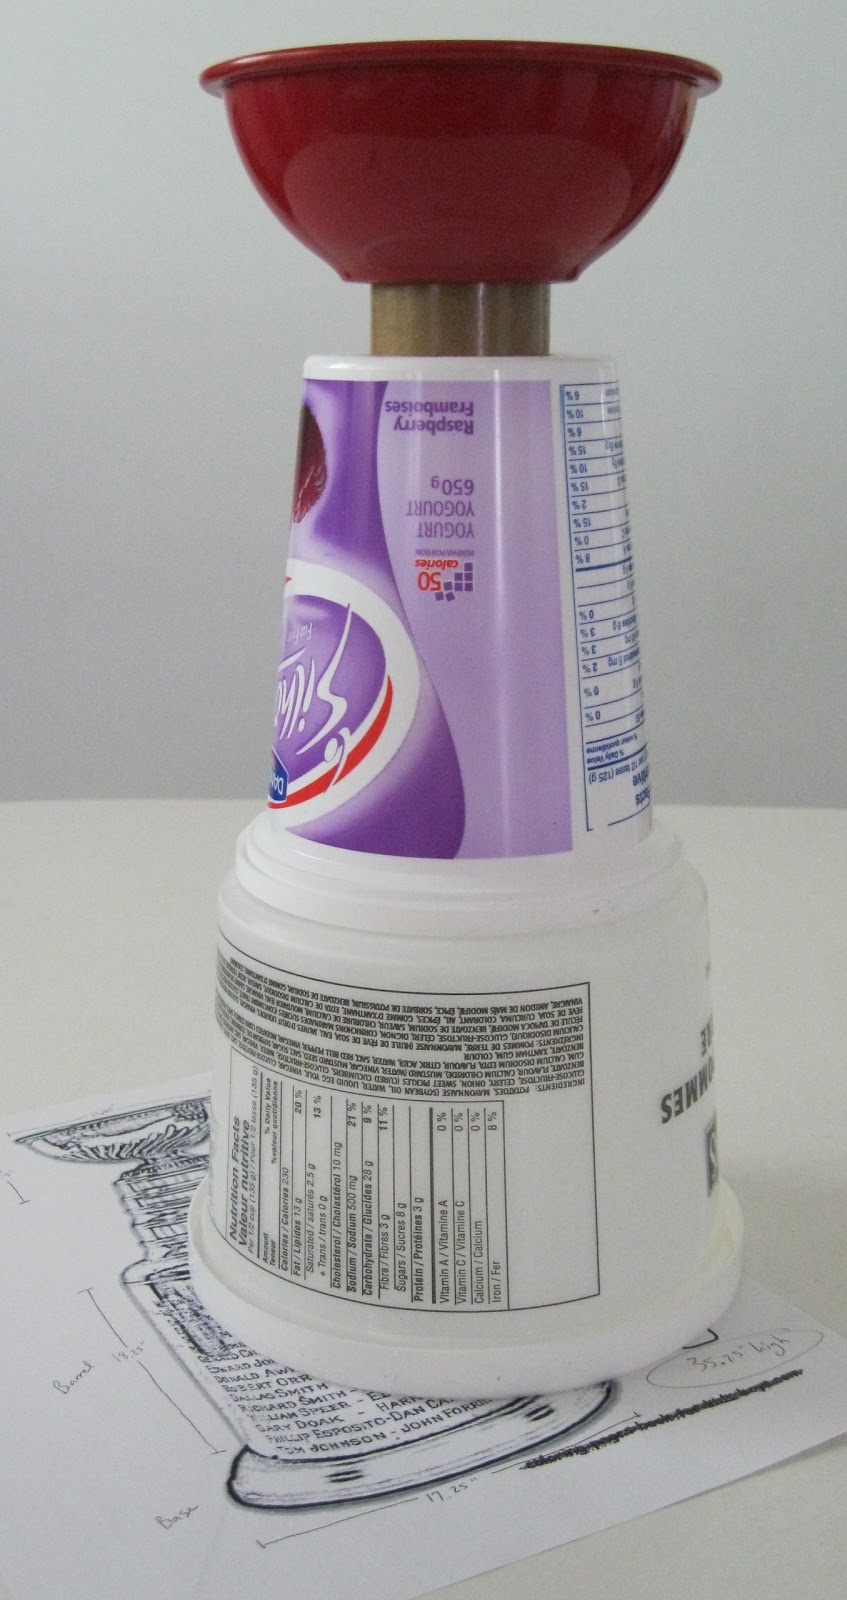
2. Once I was happy with the configuration, I drew 4 evenly spaced lines around each of the plastic containers and put a line of hot glue on these lines to create ridges. I also did a line of hot glue around the bottom edge of both containers.


3. After stuffing the containers with balled up newspaper and chunks of cardboard to make them solid, I used more hot glue to seal the lid on and fill in the gap between the container and lid.


4. I covered the individual parts with aluminum foil and foil tape, doing my best to keep it smooth on the two plastic containers but letting it be rough on the bowl to mimic the embossing on the real Cup. The last step was to use hot glue to stick the parts together. I used two circles of cardboard covered in aluminum foil - one between the tape roll and the purple container and another on the very bottom. DONE!


The top of the cup can be used as a bowl for serving silver-wrapped candies at a party or holding a beloved souvenir from your favorite team as a good luck charm for the playoffs. What other uses can you think of? I'd love to hear your ideas and see photos of your creations.

Thursday, May 24, 2012

DIY Hockey Puck Baby Toy

I've seen these shaped as cubes and balls, but the basic idea is a soft toy with tags sticking out for babies to chew on, and since I love hockey, I decided to make one shaped like a hockey puck for my son.

MATERIALS:
- black fabric
- thread, sewing machine, notions
- ribbon, tags, patches, etc.
- stuffing
- crinkly plastic (optional)
- rattle (optional) *I used 2 buttons inside a tiny plastic container that I glued shut and sewed into its own fabric pouch.


1. If you are making a rattle to go inside the puck, start by making that. I used a scrap of fabric that I sewed on three sides before inserting the rattle and hand sewing closed.


2. Cut out two circles of black fabric. Measure around them and cut a strip that length plus seam-allowance and sew it end-to-end.

3. If you want to sew a patch on, do it now. Lay one circle on your work surface right side up. Place several ribbons/tags on top of the circle with the ends that you want sticking out aimed into the center. Carefully place the strip of black face down on top of the tags and pin in place. Sew around the circle, backstitching at least once every time you cross a tag/ribbon.


4. Add another layer of tags/ribbons to the strip and top this with the other circle. Pin together and sew almost all the way around, leaving a space for turning.

5. Turn the puck right side out and stuff it with crinkly plastic, stuffing, rattle, more stuffing, and more plastic.


6. Sew up the opening. DONE!


I have NO idea why EVERY picture came up sideways. I've been trying to post this for a week now and I'm finally just posting it with the pictures sideways because I can't get them to work properly.

Friday, May 11, 2012

DIY Mountain Range Ice Cream Cake


My husband loves the mountains, cake, and ice cream, so for his birthday I made him this cake.

MATERIALS:
- 2 cake pans that are the same size
- cake mix or ingredients
- ice cream
- icing: white, dark green, light green, yellow
- large chunks of chocolate
- baking and decorating supplies

1. Bake the cake and let it cool.

2. Leave the ice cream out for about 20 minutes so it's just a bit soft. Spoon some into a cake pan the same size as your cake and smooth it as much as you can. Refreeze it for several hours.

3. Slice the cake in half horizontally and carefully remove the top half. I flipped it onto a plate. Use a flipper to lift the ice cream out of the pan and place it onto the bottom half of the cake. Replace the top half. Cover with plastic wrap or tin foil and put back in the freezer until you are ready to do the decorating.

4. Prepare the icing and decorating materials. Break up the chocolate into rough chunks that look like rocks.

5. Work quickly so the ice cream doesn't get too soft. Spread some light green icing on the entire top of the cake, with lots in the middle. Stick your chunks of chocolate into this icing in a rough line across the cake. Use a star tip to make dark green icing trees around and between the chunks of chocolate. Add more little chunks of chocolate around the trees. Spread yellow icing around the rest of the cake, leaving a little light green border around the trees/mountains and drag a fork through it to create rows so it looks like fields. Add a few blobs of white icing on the tops of the chocolate chunks to look like snow.

6. Use toothpicks to keep the plastic wrap or tin foil from sticking to the icing and put the cake back in the freezer until just before you want to serve it. DONE.

Tuesday, May 1, 2012

I ♥ Ladybugs!

I love ladybugs - both live ones and decorative ones. I have ladybug glasses, a magnet, wind chimes, tea towels, a table cloth, a dish for my pot scrubbers... My mom also painted some ladybug rocks for me, along with a rock that says: ladybugs welcome. I have other ladybug decorations in my flower beds and my library contains the fantastic book Ladybugs of Alberta by John Acorn.

As a teenager I had the unique experience of discovering what I can only describe as a ladybug nest. At first I thought the ground was bleeding, because it looked like red veins flowing out from a bubbling, raspberry-like center. I cautiously moved closer and found that it was thousands of pin-head-sized ladybugs, bright red with two tiny black spots each, rushing up out of the ground and off into the world in little trails. It was amazing.

I came across this wonderfull ladybug-themed party and am posting the link here in hopes that someone will host one for me for my next birthday: Hostess with the Mostess.