When your baby is born, it's a lots of fun to start saving keepsakes for them. I suggest starting a box, although you may prefer to put some things I've suggested below in a scrapbook or binder. You may also want to start two boxes, one that is basically a time capsule and one for items for baby to use in the future.
First, you'll need a box with a lid. It can be cardboard, wood, or plastic. Here are some suggestions:
- box from a baby gift
- box from baby formula, diapers, wipes, etc.
- store-bought baby keepsake box
- family heirloom box or chest
- any sturdy box, decorated if desired
Add baby's name to the outside of the box, if desired.
Second, start filling the box. Here are some items to consider:
- baby cards, gift tags, and ribbons
- baby's first/favorite bottle, outfit, toy, shoes, etc.
- hospital bracelet, crib card, etc.
- newspapers from the day/week baby was born
- magazines from the week/month baby was born
- comic book from the month baby was born, especially if baby shares their name with a character
- souvenir from your favorite/local sports team(s), especially from baby's first game
- souvenir from sports championship for the year/season baby was born (hat, shirt, replica ring, etc.)
- CD with the #1 song from the week baby was born
- DVD/blu-ray/memorabilia from the #1 movie from the week baby was born
- personalized items that are for when baby gets older (pencil, key chain, jackknife, etc.)
- sports cards of athletes who share baby's name or birthday
- coins and postage stamps from the year baby was born
- mementos from the Chinese zodiac year baby was born
These are just a few suggestions. Please comment with your ideas. Have fun!

glue, tape, stickers, hockey...
Showing posts with label baby. Show all posts
Showing posts with label baby. Show all posts
Saturday, May 28, 2016
Monday, October 8, 2012
Hockey First Birthday
For my son's first birthday, I threw him a hockey themed party. Here are some photos and details:
- invitation = ticket
- cake = foam finger
- Oreos = hockey pucks
- sugar cookie hockey sticks and foam fingers
- arena food menu: pizza, hot dogs, burgers, popcorn, nachos, pretzels, chips
- foam finger pencil toppers and mini Zamboni souvenirs
- scoreboard
- custom water bottle labels and stickers on pop cans
- glass trays = ice
- silver bowls = the Cup
- first star selection
- first draft pick
- pendants banner
- replica Stanley Cup filled with silver candies
- hockey card "thank you"s

1. MINI FOAM FINGERS: I printed off a picture of a foam finger and traced it onto cardboard. After cutting it out of cardboard, I used it as my template to trace onto thin craft foam in various colors. I used Sharpies and paint markers to outline the shape and to write big number 1s on them. I rolled strips of foam into tubes and glued them to the backs, turning them into pencil toppers.

2. SCOREBOARD: I downloaded a picture of a scoreboard that I liked and edited on my computer to add my son's name, make the score 1-0, and make it the first period. I printed four copies of this. I covered an almost cube-shaped box with black wrapping paper, leaving the top open so I will be able to use it as a keepsake box later, then glued a scoreboard to each side. I added a picture from The Hockey News magazine to the bottom, some NHL team logo stickers around the sides, and string to the top so I could hang it from the ceiling.

3. SUGAR COOKIES:
a. HOCKEY STICKS: After rolling out the dough, I cut out simple hockey stick shapes with a knife, then decorated them with icing.
b. FOAM FINGERS: Using the same template as the craft foam fingers, I created my own cookie cutter from an aluminum baking pan, then used it to cut the shapes out of the dough. Each cookie was decorated with colored icing first, then had a number 1 added in white or chocolate icing.
4. MINI STANLEY CUP: I printed off a simple picture of the Stanley Cup for reference, then stacked up two plastic containers (with lids on), a center piece from a roll of tape, and a little bowl. Once I was happy with the configuration, I drew 4 evenly spaced lines around each of the plastic containers and put a line of hot glue on these lines to create ridges. I also did a line of hot glue around the bottom edge of both containers. After stuffing the containers with balled up newspaper and chunks of cardboard to make them solid, I used more hot glue to seal the lid on and fill in the gap between the container and lid. I covered the individual parts with aluminum foil and foil tape, doing my best to keep it smooth on the two plastic containers but letting it be rough on the bowl to mimic the embossing on the real Cup. The last step was to use hot glue to stick the parts together.

5. PAPER ZAMBONI FAVOR BOXES: I designed a pattern for a paper zamboni and printed it on colored cardstock. After cutting and folding them, I secured the sides with staples (you could use glue or tape) and filled them with candy before tying a ribbon around them. These would be fun for older kids to color as a party activity. NOTE: I believe that Kinder Surprise, Eggtopia NHL Eggs and other similar chocolate eggs with toys inside will fit inside these. I filled them with mini chocolate bars.

6. CONCESSION SIGN & FOOD LABELS:
a. CONCESSION SIGN: I typed up the concession sign in Word, using black capital letters and red punctuation/numbers and printed it on white cardstock. I added pieces of a Coca-Cola box to the center page, then glued all three pages to a large piece of cardboard that I wrapped in black wrapping paper.
b. FOOD LABELS: I printed off the labels on white cardstock and drew/colored the pictures. After cutting them out, I glued them onto colored cardstock.

7. BANNERS: I printed out the letters in my son's name on colored card stock and cut them out in the shape of hanging banners (rectangle with the bottom 2 corners cut off to form an arrow shape). I glued these onto slightly larger pieces of colored cardstock, then strung them together on ribbon.

8. CUSTOM BOTTLES OF WATER: I set up a sheet of "labels" in Word that were as wide as I could make them and 1.88" high (5/sheet). I downloaded images of NHL team jerseys and inserted them into the labels, then typed my son's name and "1st BIRTHDAY" in a coordinating color. I printed them on regular white paper, cut them into strips, and attached them with a long strip of clear packing tape that covered the paper completely and was sticky at both ends to stick onto the bottle. I recommend removing the original label first.
9. NHL DRAFT BOARD: I printed a 1 (black printing on white background) and my son's full name (white printing with black "highlighting") on white cardstock and cut it out. I also printed the logos from the most recent NHL draft. I glued these to a large piece of black poster board. I also glued photos of my son to the board.

10. FOAM FINGER CAKE: I baked a 9"x13" cake and trimmed it in the shape of a foam finger, leaving the pointer finger quite wide to avoid having it break when I moved the cake to the tray. I decorated it with red and white icing and used a matching 1-shaped candle.

11. HOCKEY ICE TABLE: Since our kitchen table is a white oval, I used red and blue duct tape and red and white paper with clear mactac to create a rink on the top of it.
We own a lot of hockey memorabilia, jersey, blankets, etc., so I used those throughout our kitchen and living room to decorate.
Monday, June 11, 2012
30 NHL Team Pocket Schedule Project
I've been working on this post for months and will continue to update it as responses come in, but since the season is now over (congratulations to the LA Kings on their first Stanley Cup), I thought I'd post it.
As the 2011-12 NHL season began to wind down, I had an idea: since my son was born at the beginning of the season, I would try to collect pocket schedules from all 30 teams for his keepsake box. I went on the teams' websites to find their contact information and any specifications for requesting pockets schedules and/or fan packs. Some teams accept e-mail requests, some require a SASE, and some don't give any information, so I just hand-wrote them a nice letter and fired it in the mail. Here is what I got back:
Anaheim Ducks: 1 pocket schedule, 1 player card, 2 decals
Boston Bruins:
Buffalo Sabres: 1 pocket schedule, 1 magnet, 1 window decal
Calgary Flames: 3 player cards, 6 stickers
Carolina Hurricanes: 1 sticker, 2 tattoos, 2 cards
Chicago Blackhawks:
Colorado Avalanche: 4 pocket schedules
Columbus Blue Jackets:
Dallas Stars: 1 pocket schedule, 1 player card
Detroit Red Wings: 1 tattoo, 1 sticker, 1 decal, 2 player cards
Edmonton Oilers:
Florida Panthers: 3 pocket schedules
Los Angeles Kings:
Minnesota Wild:
Montreal Canadiens: 5 player cards, 1 sticker
Nashville Predators: 1 pocket schedule
New Jersey Devils: 2 pocket schedules
New York Islanders:
New York Rangers: 4 pocket schedules, 4 wallet card schedules
Ottawa Senators: e-mailed to inform me that they did not produce a paper schedule
Philadelphia Flyers:
Phoenix Coyotes: 2 pocket schedules
Pittsburgh Penguins: 2 pocket schedules
San Jose Sharks: 1 pocket schedule, 1 magnet, 1 sticker, 3 tattoos, 5 cards
St. Louis Blues: 3 pocket schedules, 2 decals
Tampa Bay Lightning:
Toronto Maple Leafs:
Vancouver Canucks: 5 players cards, 1 decal
Washington Capitals:
Winnipeg Jets:
Thursday, May 24, 2012
DIY Hockey Puck Baby Toy
I've seen these shaped as cubes and balls, but the basic idea is a soft toy with tags sticking out for babies to chew on, and since I love hockey, I decided to make one shaped like a hockey puck for my son.
MATERIALS:
- black fabric
- thread, sewing machine, notions
- ribbon, tags, patches, etc.
- stuffing
- crinkly plastic (optional)
- rattle (optional) *I used 2 buttons inside a tiny plastic container that I glued shut and sewed into its own fabric pouch.
1. If you are making a rattle to go inside the puck, start by making that. I used a scrap of fabric that I sewed on three sides before inserting the rattle and hand sewing closed.

2. Cut out two circles of black fabric. Measure around them and cut a strip that length plus seam-allowance and sew it end-to-end.
3. If you want to sew a patch on, do it now. Lay one circle on your work surface right side up. Place several ribbons/tags on top of the circle with the ends that you want sticking out aimed into the center. Carefully place the strip of black face down on top of the tags and pin in place. Sew around the circle, backstitching at least once every time you cross a tag/ribbon.

4. Add another layer of tags/ribbons to the strip and top this with the other circle. Pin together and sew almost all the way around, leaving a space for turning.
5. Turn the puck right side out and stuff it with crinkly plastic, stuffing, rattle, more stuffing, and more plastic.

6. Sew up the opening. DONE!

MATERIALS:
- black fabric
- thread, sewing machine, notions
- ribbon, tags, patches, etc.
- stuffing
- crinkly plastic (optional)
- rattle (optional) *I used 2 buttons inside a tiny plastic container that I glued shut and sewed into its own fabric pouch.

2. Cut out two circles of black fabric. Measure around them and cut a strip that length plus seam-allowance and sew it end-to-end.
3. If you want to sew a patch on, do it now. Lay one circle on your work surface right side up. Place several ribbons/tags on top of the circle with the ends that you want sticking out aimed into the center. Carefully place the strip of black face down on top of the tags and pin in place. Sew around the circle, backstitching at least once every time you cross a tag/ribbon.

4. Add another layer of tags/ribbons to the strip and top this with the other circle. Pin together and sew almost all the way around, leaving a space for turning.
5. Turn the puck right side out and stuff it with crinkly plastic, stuffing, rattle, more stuffing, and more plastic.

6. Sew up the opening. DONE!

I have NO idea why EVERY picture came up sideways. I've been trying to post this for a week now and I'm finally just posting it with the pictures sideways because I can't get them to work properly.
Saturday, March 17, 2012
DIY Referee Bib
My cousin is a hockey referee so I thought it would be fun to make bibs for his kids that look like referee uniforms.

MATERIALS:
- white fabric (I used a t-shirt)
- black fabric (I used denim)
- thread, sewing machine, notions, etc.
- acrylic craft paint (black, orange), brush
- masking tape
- bias tape, ribbon, or cord
1. Cut out a bib shape from both the white and black fabric. I traced around another bib.
2. Apply strips of tape to the areas of the bib that you want to stay white, including the areas that will be orange. Make sure that the tape is stuck down well from edge to edge.

3. Paint the exposed areas black and let the paint dry. Remove the tape.

4. Outline the area that will be orange with black paint. Let it dry.

5. Paint the orange area. Let it dry.
6. Lay the painted/white piece on top of the black piece, wrong sides together, and tuck 2 pieces of bias tape/ribbon/cord in between the layers on either side of the neck opening.
7. Sew all the way around the edges of the bib. Clip the edge fabric approximately every inch to create a "rag-time" look. DONE!
Wednesday, February 15, 2012
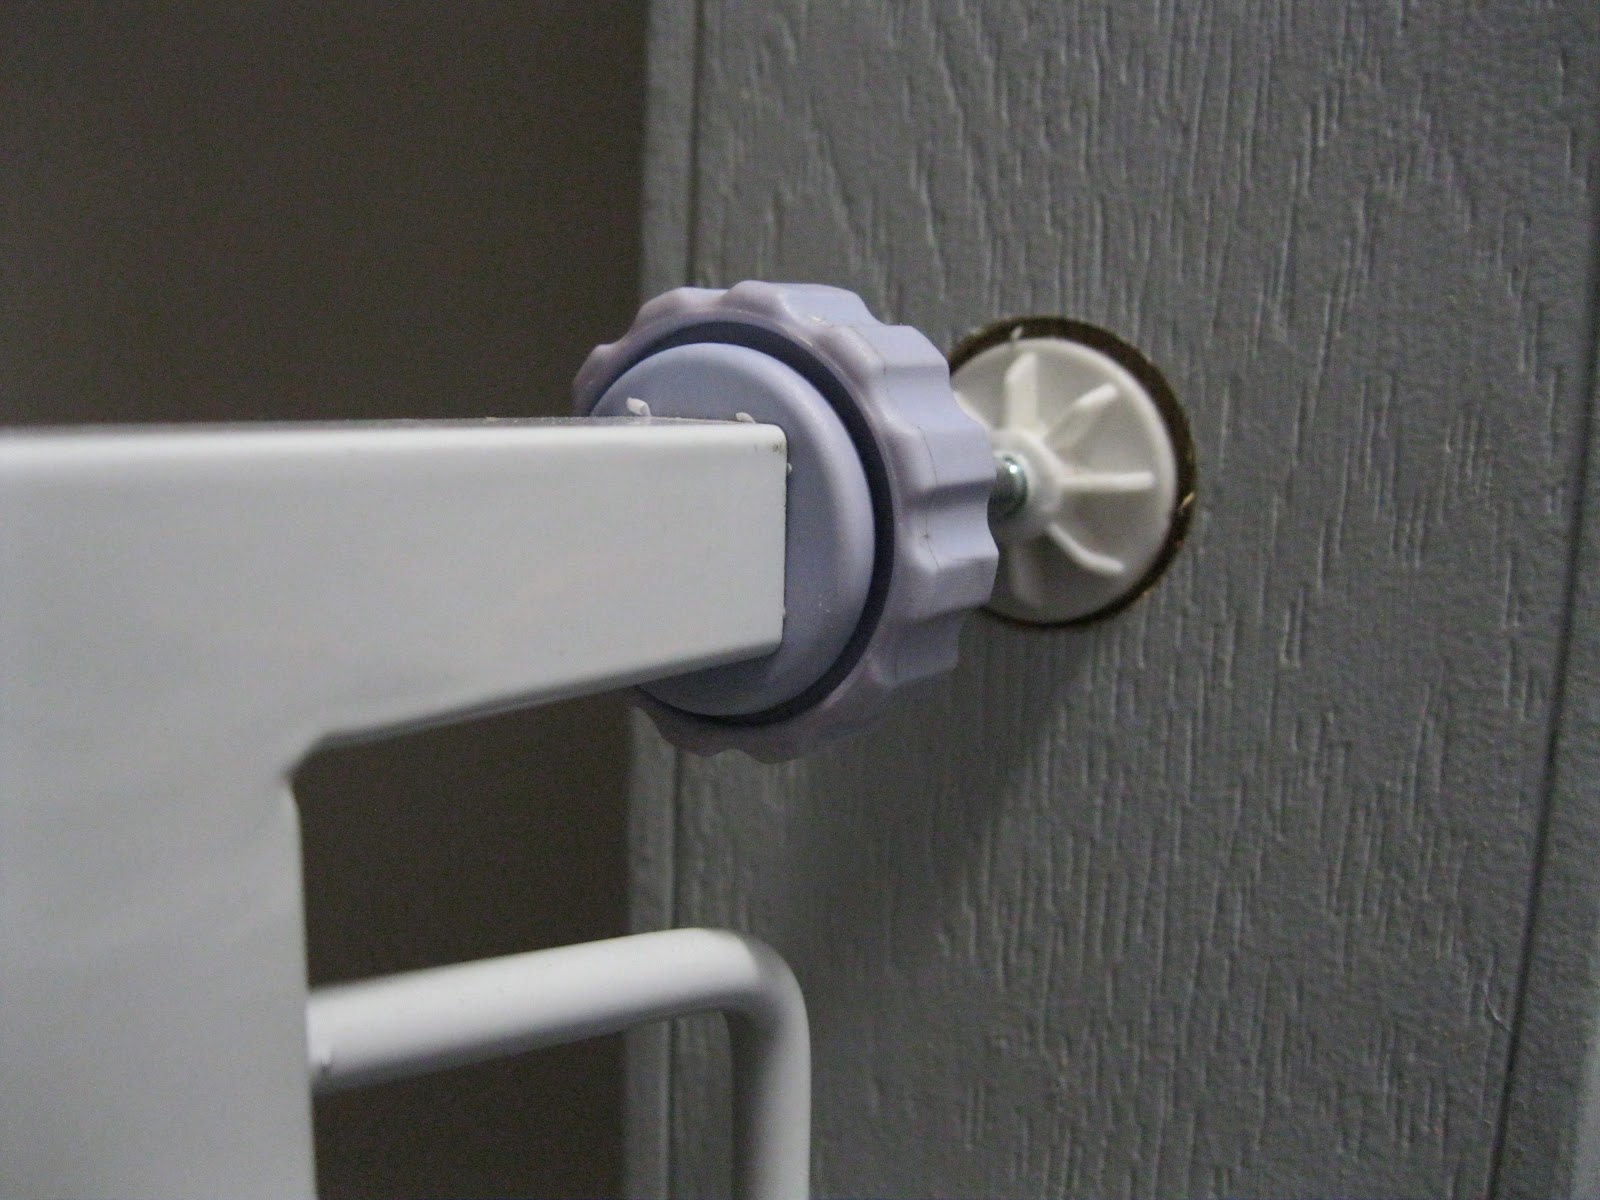
DIY Make a Tension-Style Baby Gate Sturdier
I say DIY, but I didn't do it myself and it really wasn't my idea, I was just insistent that there had to be a way to make our tension-style baby gate sturdier and kept bouncing ideas off people until my uncle came up with the best idea and my dad put it into effect for me.
This is for the type of baby gates that fit in a doorway with threaded rods on both sides that you tighten against the door frame. I couldn't get ours tight enough that I couldn't just grab it and tilt it, which left me fairly certain that if an adult was falling and reached for it to steady themselves, the gate would move and they would fall down the stairs.
Our solution was to use a drill bit that was slightly larger than the pads at the end of the threaded rods (not a hole-saw, a large drill bit) and drill into the door frame in the four spots where the ends of the rods touched. We put the gate in place first, leveled it and centered it, then traced around the pads, removed the gate, drilled, then replaced the gate and tightened the rods. DONE! No more movement in the gate, so no chance that the baby, the dog, or anyone can get (or fall) down the stairs without opening the gate. The only thing left is to paint inside the holes we drilled, but there's no rush on that. And if we ever want to remove the gate, a little drywall putty and paint will erase the holes.
Subscribe to:
Posts (Atom)