When your baby is born, it's a lots of fun to start saving keepsakes for them. I suggest starting a box, although you may prefer to put some things I've suggested below in a scrapbook or binder. You may also want to start two boxes, one that is basically a time capsule and one for items for baby to use in the future.
First, you'll need a box with a lid. It can be cardboard, wood, or plastic. Here are some suggestions:
- box from a baby gift
- box from baby formula, diapers, wipes, etc.
- store-bought baby keepsake box
- family heirloom box or chest
- any sturdy box, decorated if desired
Add baby's name to the outside of the box, if desired.
Second, start filling the box. Here are some items to consider:
- baby cards, gift tags, and ribbons
- baby's first/favorite bottle, outfit, toy, shoes, etc.
- hospital bracelet, crib card, etc.
- newspapers from the day/week baby was born
- magazines from the week/month baby was born
- comic book from the month baby was born, especially if baby shares their name with a character
- souvenir from your favorite/local sports team(s), especially from baby's first game
- souvenir from sports championship for the year/season baby was born (hat, shirt, replica ring, etc.)
- CD with the #1 song from the week baby was born
- DVD/blu-ray/memorabilia from the #1 movie from the week baby was born
- personalized items that are for when baby gets older (pencil, key chain, jackknife, etc.)
- sports cards of athletes who share baby's name or birthday
- coins and postage stamps from the year baby was born
- mementos from the Chinese zodiac year baby was born
These are just a few suggestions. Please comment with your ideas. Have fun!

glue, tape, stickers, hockey...
Showing posts with label magazine. Show all posts
Showing posts with label magazine. Show all posts
Saturday, May 28, 2016
Monday, March 26, 2012
DIY Packing Tape Transfers/Stickers
My mom reminded me about this technique on the weekend. I had seen this fun project on How About Orange and had been meaning to try it, so Mom and I did some experimenting...
MATERIALS:
- pictures from magazines or printed with a laser printer (photographs and inkjet images don't work)
- clear packing tape (clear mactac also works, but not quite as well)
- a dish of warm water
- stuff to stick your images on (vases, candle holders, greeting cards, picture frames, basically anything)
1. Cut out the image (or tear around it for a different effect). Keep in mind that anything that is white will become clear.
2. Cover the image with packing tape. If it is bigger than a single piece of tape, overlap the tape a bit. Rub the tape down firmly (use your fingernail).
3. Soak the entire thing in water for a few minutes. Carefully rub the back side, rubbing away the paper. The ink will stay on the tape.
4. The tape will still be a bit sticky, but you can use mod podge or a similar glue to help it stick. DONE!
This is really fun and the possibilities are endless. I did a bunch of NHL team logos to decorate my son's hockey stick headboard. I'm going to try writing on paper with markers and see if that works too - I'll keep you posted.
Friday, February 3, 2012
DIY Gift Bag from Magazine Pages
Here is a tutorial for making a custom gift bag out of magazine covers and pages. For tutorials on turning envelopes or newspaper pages into gift bags, visit: http://howaboutorange.blogspot.com/.
MATERIALS:
- 2 magazines that you can remove the ENTIRE cover in ONE piece
- 2 magazine pages with pictures/text that you like
- coordinating pictures (optional)
- scissors
- glue
- tape
- single hole punch
- ribbon, cord, or string

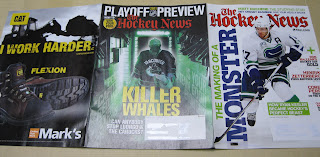
Here I have some spare pages, two full-sized pages (goalie and skater), and two full covers (remove the staples and spread open flat). *I used pages from my favorite magazine, The Hockey News, which always has great covers, photos, and articles.
DISCLAIMER: This is for a friend who is a Canucks fan - it would NOT be my first choice of teams if the bag was for myself.
1. Layer your two covers so that they are both face-up with one front cover (goalie) on top of the back cover of the other (skater). Glue together. I used spray glue.
2. Flip everything over so you are looking at the insides of the covers but the text/photos are right-side up. Position your full-sized pages so that one is on the inside of the center page (goalie front cover) and the other is on the inside of the right page (goalie back cover). DOUBLE CHECK that you haven't got both of them on the back of your front covers. Glue.

3. Fold the right sight into the center THEN fold the left side in on top. DOUBLE CHECK that your full-page photos are face-to-face on the inside and that both your front covers are on the outside. Glue the back of your full-page photo to the back of the front cover that you haven't glued to yet.

4. You should now have a flat tube with your full-page photos on the inside and your front covers on the outside.

5. Lay your "tube" on a flat surface. Fold the sides in at approx. 1" (2.5cm) and crease well. Open it back up. Fold the bottom up at approx. 2" (5cm) and crease well. Open it back up.

6. Fold and crease all these folds to the back also. When you do the side folds, puff the tube out and shift the edge from the joint between your covers to one of your new folds, then flatten it again so that you can tape down your joint to reinforce it. I used clear hockey tape.

7. Puff up your tube again and pinch your side folds so that it looks like a rectangle from the end. Slowly push in the side "flaps" of the bottom using your folds to keep the corners sharp.

8. Once you have your folds where you want them, crease them firmly and fold the newly formed (almost triangular) front and back flaps on top of your side flaps. Crease. Secure your layers with glue and/or tape.

9. If you want your bag to be able to lie flat, push in the sides (where you taped the seams) and fold the bottom to one side and crease.

10. Now your bag is basically complete. If you want, you can glue one of your spare pictures inside the bottom of the bag to hide your flaps.

11. You can either fold the top of your bag over and tape or staple it to close it (with the gift inside, obviously), or you can add handles. To add handles, pinch the top of the bag shut and punch two holes through both the front and back of the bag. Tie coordinating ribbon, cord or string through the holes, either in a circle or U-shape with big knots at the ends. You could also skip the holes and just glue and/or tape a loop of ribbon or string to the inside of both sides of the bag. *If you want to make a gift tag for your bag with your spare pictures and cardstock, make sure you add it to your handle BEFORE you knot or glue. If you forget, just add another piece of ribbon or string to your gift tag and tie it onto your handle.

12. DONE! You can use some of your spare pictures and pages to make a matching greeting card, decorated envelope, or even in lieu of tissue paper to hide the gift inside.
MATERIALS:
- 2 magazines that you can remove the ENTIRE cover in ONE piece
- 2 magazine pages with pictures/text that you like
- coordinating pictures (optional)
- scissors
- glue
- tape
- single hole punch
- ribbon, cord, or string

Here I have some spare pages, two full-sized pages (goalie and skater), and two full covers (remove the staples and spread open flat). *I used pages from my favorite magazine, The Hockey News, which always has great covers, photos, and articles.
DISCLAIMER: This is for a friend who is a Canucks fan - it would NOT be my first choice of teams if the bag was for myself.
1. Layer your two covers so that they are both face-up with one front cover (goalie) on top of the back cover of the other (skater). Glue together. I used spray glue.

2. Flip everything over so you are looking at the insides of the covers but the text/photos are right-side up. Position your full-sized pages so that one is on the inside of the center page (goalie front cover) and the other is on the inside of the right page (goalie back cover). DOUBLE CHECK that you haven't got both of them on the back of your front covers. Glue.

3. Fold the right sight into the center THEN fold the left side in on top. DOUBLE CHECK that your full-page photos are face-to-face on the inside and that both your front covers are on the outside. Glue the back of your full-page photo to the back of the front cover that you haven't glued to yet.

4. You should now have a flat tube with your full-page photos on the inside and your front covers on the outside.

5. Lay your "tube" on a flat surface. Fold the sides in at approx. 1" (2.5cm) and crease well. Open it back up. Fold the bottom up at approx. 2" (5cm) and crease well. Open it back up.

6. Fold and crease all these folds to the back also. When you do the side folds, puff the tube out and shift the edge from the joint between your covers to one of your new folds, then flatten it again so that you can tape down your joint to reinforce it. I used clear hockey tape.

7. Puff up your tube again and pinch your side folds so that it looks like a rectangle from the end. Slowly push in the side "flaps" of the bottom using your folds to keep the corners sharp.

8. Once you have your folds where you want them, crease them firmly and fold the newly formed (almost triangular) front and back flaps on top of your side flaps. Crease. Secure your layers with glue and/or tape.

9. If you want your bag to be able to lie flat, push in the sides (where you taped the seams) and fold the bottom to one side and crease.

10. Now your bag is basically complete. If you want, you can glue one of your spare pictures inside the bottom of the bag to hide your flaps.

11. You can either fold the top of your bag over and tape or staple it to close it (with the gift inside, obviously), or you can add handles. To add handles, pinch the top of the bag shut and punch two holes through both the front and back of the bag. Tie coordinating ribbon, cord or string through the holes, either in a circle or U-shape with big knots at the ends. You could also skip the holes and just glue and/or tape a loop of ribbon or string to the inside of both sides of the bag. *If you want to make a gift tag for your bag with your spare pictures and cardstock, make sure you add it to your handle BEFORE you knot or glue. If you forget, just add another piece of ribbon or string to your gift tag and tie it onto your handle.

12. DONE! You can use some of your spare pictures and pages to make a matching greeting card, decorated envelope, or even in lieu of tissue paper to hide the gift inside.
Subscribe to:
Posts (Atom)