My mom reminded me about this technique on the weekend. I had seen this fun project on How About Orange and had been meaning to try it, so Mom and I did some experimenting...
MATERIALS:
- pictures from magazines or printed with a laser printer (photographs and inkjet images don't work)
- clear packing tape (clear mactac also works, but not quite as well)
- a dish of warm water
- stuff to stick your images on (vases, candle holders, greeting cards, picture frames, basically anything)
1. Cut out the image (or tear around it for a different effect). Keep in mind that anything that is white will become clear.
2. Cover the image with packing tape. If it is bigger than a single piece of tape, overlap the tape a bit. Rub the tape down firmly (use your fingernail).
3. Soak the entire thing in water for a few minutes. Carefully rub the back side, rubbing away the paper. The ink will stay on the tape.
4. The tape will still be a bit sticky, but you can use mod podge or a similar glue to help it stick. DONE!
This is really fun and the possibilities are endless. I did a bunch of NHL team logos to decorate my son's hockey stick headboard. I'm going to try writing on paper with markers and see if that works too - I'll keep you posted.

glue, tape, stickers, hockey...
Monday, March 26, 2012
Friday, March 23, 2012
More "Hidden" Floor Vent Covers
I used sunflower yellow spray paint and wood-grain mactac to cover more of my floor vent covers, transforming them from this...

...to this.


...to this.

Tuesday, March 20, 2012
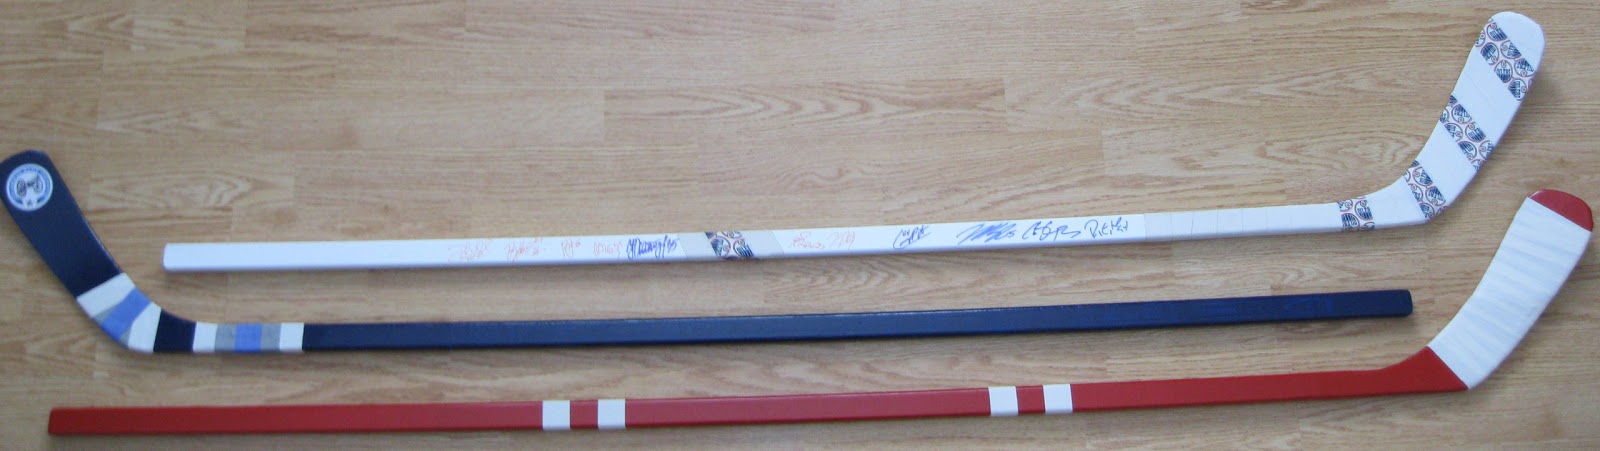
DIY Turn a Broken Hockey Stick into a Keepsake
I got this idea last summer when I was at an autograph session and saw a guy with a completely white hockey stick with a small Oilers logo on the blade. In my collection of broken hockey sticks I had several that were complete sticks with broken blades, so I decided to "repair" them.

MATERIALS:
- hockey stick (tape/stickers removed, washed)
- strong glue
- spray paint
- hockey tape
- stickers/decals
- acrylic craft paint
1. Use glue and tape to put your broken stick back together.
2. Spray paint the entire stick the color of your choice.
3. Wrap hockey tape around your repaired areas to hide them. You can use tape with a design on it or paint the tape with acrylic craft paint (stick the tape on a plastic container and paint it before you wrap it on the stick). Add decals if desired.
a. On the white stick, I used tape with Oilers logos on it - 5 strips, one for each Stanley Cup.
b. On the blue stick, I painted the tape to match the CBJ third jersey's stripes and added a decal on the blade.
c. On the red stick, I stuck with just plain tape, again mimicking the jersey stripes, and will add a Team Canada decal on the tape on the blade.
*If you plan to get autographs on the stick, test your marker on a spot where you will be adding tape or a decal. You want the marker to show up well, write easily, and dry quickly. I recommend Sharpies.
Saturday, March 17, 2012
DIY Referee Bib
My cousin is a hockey referee so I thought it would be fun to make bibs for his kids that look like referee uniforms.

MATERIALS:
- white fabric (I used a t-shirt)
- black fabric (I used denim)
- thread, sewing machine, notions, etc.
- acrylic craft paint (black, orange), brush
- masking tape
- bias tape, ribbon, or cord
1. Cut out a bib shape from both the white and black fabric. I traced around another bib.
2. Apply strips of tape to the areas of the bib that you want to stay white, including the areas that will be orange. Make sure that the tape is stuck down well from edge to edge.

3. Paint the exposed areas black and let the paint dry. Remove the tape.

4. Outline the area that will be orange with black paint. Let it dry.

5. Paint the orange area. Let it dry.
6. Lay the painted/white piece on top of the black piece, wrong sides together, and tuck 2 pieces of bias tape/ribbon/cord in between the layers on either side of the neck opening.
7. Sew all the way around the edges of the bib. Clip the edge fabric approximately every inch to create a "rag-time" look. DONE!
Thursday, March 15, 2012
Another Beautiful Spring Day
It's hard to stay inside and craft when the weather is so beautiful - needless to say, I still have a pile of projects waiting for me.
I have to add another project to my list: referee toddler bib. It's started and I'll post photos and instructions once it's done.
I have to add another project to my list: referee toddler bib. It's started and I'll post photos and instructions once it's done.
Monday, March 12, 2012
Creativity Stymied
My creativity has been stymied lately as a result of a vicious battle with a stomach flu, so I apologize for my lack of posts - I'm hoping to be back to crafting and sewing (and blogging about it) soon. Some projects that I'd like to get done in the next little while are:
- turning a broken hockey stick into a display stick to collect autographs on
- mending a quilt that the dog chewed a hole in
- making more floor vents disappear
- sewing a hockey puck shaped baby toy
Tuesday, March 6, 2012
A Shoebox Full of Trading Cards
It's not an unusual sight; shoeboxes full of trading cards are common in basements, closets, attics, and garages across North America. My house is no different, I have several shoeboxes full of hockey cards, but I also have one very special shoebox.

This box is going to bring smiles to the faces of kids. This box is full of carefully repackaged cards that I'm going to give to a local children's hospital or charity. I was inspired by Cards 2 Kids, an organization started by a teenager to give sports cards to sick kids. I knew that between my own collection and the cards I had acquired at garage sales, that I could do something similar myself. I got a bunch of zipper bags at a dollar store and sorted through my cards, making up packages that contained an even mix of modern and retro cards, rookies and stars, current and former Edmonton Oilers, and, of course, lots of Upper Deck cards (because they're my favorite). I also packaged up some of the non-sports trading cards that I had.
My next step is to contact some local hospitals and charities to arrange for the distribution of the cards. I'll let you know how it goes.
Monday, March 5, 2012
Mobile Blogging
I just downloaded the Google Blogger app on my smart phone and wanted to try it out. It should allow me to blog from anywhere, even when I don't have my laptop. Could come in handy. ;-)
Subscribe to:
Posts (Atom)