Saturday, July 29, 2017
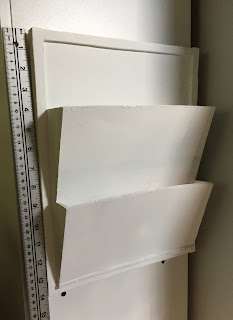
DIY Wall Mounted File Organizer
In an attempt to organize our kitchen a little better, I designed and built a wall mounted file organizer. I had looked at buying one, but couldn't find anything that fit my needs and the space where I wanted to put it. I wanted to mount it on the side of a cabinet, so I also wanted the organizer to be light weight so that I could use 3M strips to attach it, rather than screws or nails. I used foam core board, but you could use cardboard. You could also use thin wood if you want to get really fancy.
MATERIALS
- foam core board
- white glue
- ruler, pencil
- exacto knife
- acrylic paint, brush
1. Determine what size you want to make your organizer and how many "pockets" you want it to have. I wanted a letter-size piece of paper to fit "landscape" in both pockets. I chose two pockets: one for papers to be filed and one for papers to go out (letters to be mailed, coupons, etc.).
The base of my organizer is 11" wide by 14" high. I started with two pieces of foam board this size and glued one on top of the other to make a base two boards thick.
I glued 1/2" strips of foam board all the way around the front edge of my base.
2. Decide how deep you want the pockets to be. On my organizer, the bottom pocket is 4.5" deep and the top one is 5" plus it extends down inside the bottom pocket a bit.
I made the top opening of my pockets 2" from the back/base.
Draw out your side pieces so they look like two overlapping right-angle triangles. Measure the lengths of the two angled edges - these measurements will be the height of your front pieces. My front pieces are 10" wide.
3. Hold one side piece in place and mark on the top pocket front where you need to notch it so that the bottom edge of it will fit down inside the bottom pocket. Mark the opposite side of the front in the same place. Double check, then trim away the two notches.
Test-fit the pieces and make any necessary adjustments.
4. I glued a 1/2" strip on edge across the bottom of where my bottom pocket sits because I had a bit if a gap there when I test-fit the pieces.
Glue the side pieces in place. Use the fronts to ensure that you have them at 90 degrees to the back/base.
I used some more 1/2" strips inside the pockets to make the sides sturdier and ensure there weren't any gaps at the bottoms.
Glue the fronts in place. Allow all glue to dry thoroughly.
5. Paint and decorate the organizer however you please. Label your pockets, if you want to.
(The paint warped my fronts a bit, but I don't mind.)
DONE.
What fun ways did you decorate yours? Chalk paint? Your last name? An inspirational quote? Did you label the pockets with your family members' names? I haven't decide what else to do on mine so it's still just boring and white.
Subscribe to:
Post Comments (Atom)


No comments:
Post a Comment